A sharp wood chisel gives you better control, cleaner cuts, and less resistance when working with wood. A dull chisel often requires more force, which can make the tool harder to control.
The good news is that sharpening a wood chisel does not have to be difficult.
Once you understand the basic process, you can maintain your chisels with a sharpening stone, a honing guide, and a few simple tools.
In this guide, we will show you how to sharpen a wood chisel in 5 easy steps, from checking the blade to creating a clean cutting edge.
Before sharpening, it helps to understand the different wood chisels, their types, uses, and how to choose the right one for your work.
Table of Contents
What You Need to Sharpen a Wood Chisel
You do not need an expensive sharpening system to get started.
Basic equipment
- Sharpening stone
- Honing guide
- Clean water or appropriate stone lubricant
- Leather strop
- Honing compound
- Clean cloth
- Safety glasses
You can use water stones, oil stones, or diamond stones. The important thing is to use the sharpening system correctly and keep the blade angle consistent.
For a beginner, a honing guide can make angle control easier.
If you are still choosing your first set, see our guide to the best wood chisels for beginners before buying.
Understanding the Chisel Edge
Before sharpening, it helps to understand the two important surfaces of a standard bevel-edge woodworking chisel.
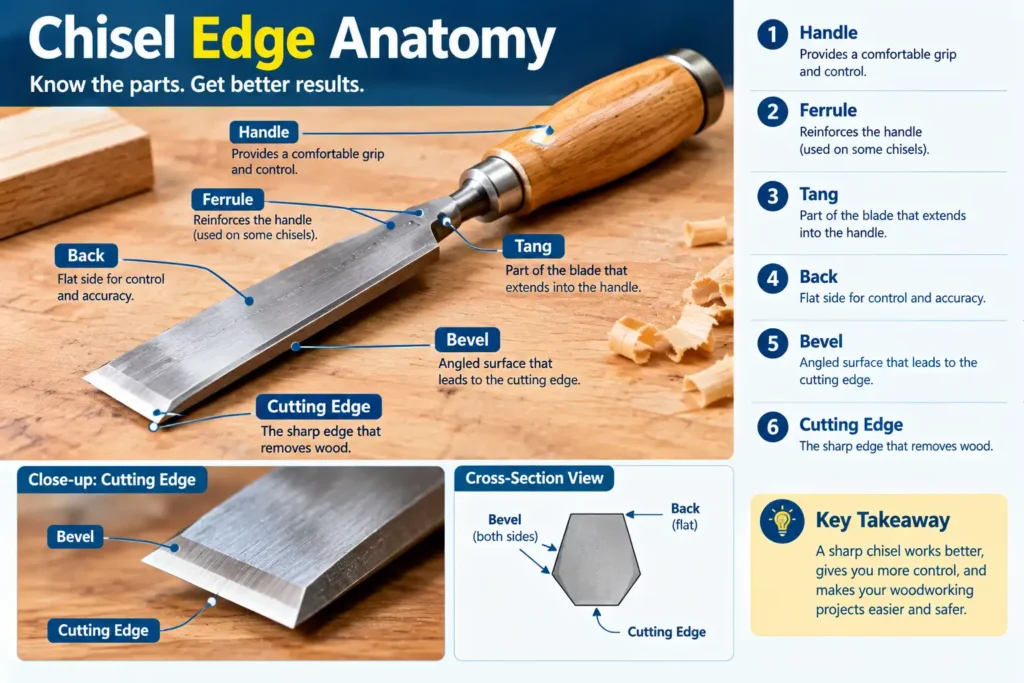
The back
The back of the chisel should be flat at the cutting area.
A flat back provides a reference surface and allows the cutting edge to meet the wood cleanly.
The bevel
The bevel is the angled surface that leads toward the cutting edge.
Many general-purpose bench chisels use a primary bevel around 25°, although the exact angle depends on the chisel and intended use. Woodcraft describes 25° as a common general-purpose bevel angle for bench chisels.
For beginners, the important thing is consistency, rather than chasing one exact number.
How to Sharpen a Wood Chisel in 5 Easy Steps
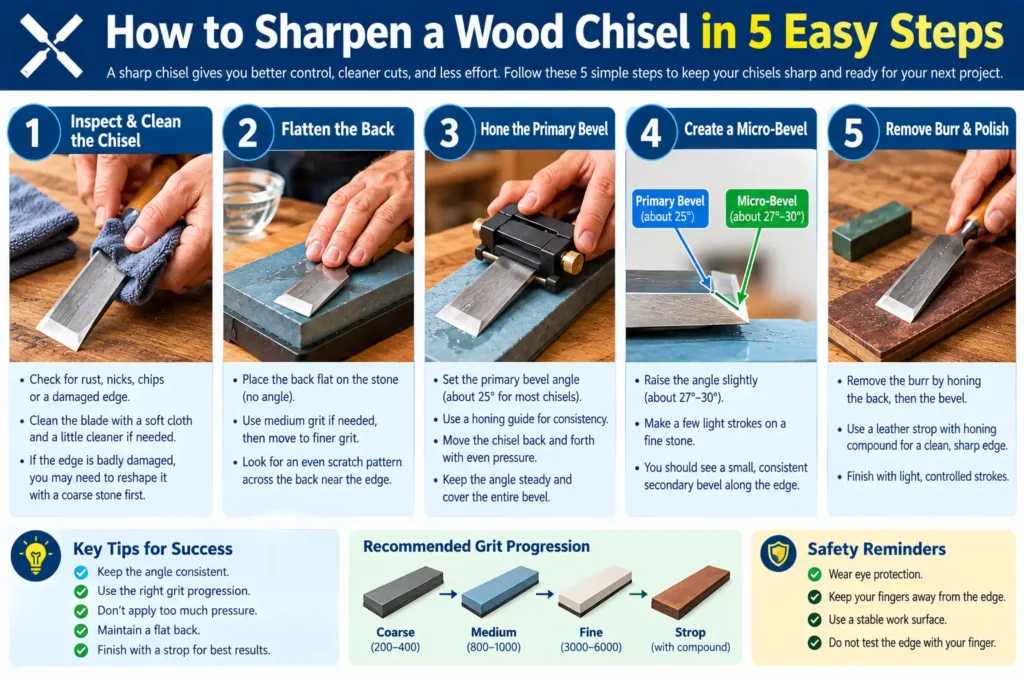
Before learning how to sharpen a wood chisel, check the condition of the cutting edge.
Step 1: Inspect and Clean the Chisel
Start by examining the blade.
Look for:
- Rust
- Nicks
- Chips
- A damaged cutting edge
- Uneven bevel
- Dirt or residue
Clean the blade before placing it on the sharpening stone.
If the edge is badly damaged, you may need to reshape it with a coarse abrasive before moving to normal honing.
Important
Do not start with a very coarse abrasive unless you actually need to remove significant damage.
A slightly dull chisel usually needs honing, not complete regrinding.
Woodcraft’s sharpening sequence similarly distinguishes between grinding for damaged or significantly worn edges and honing for normal sharpening maintenance.
Step 2: Flatten the Back
This is one of the most important parts of sharpening a new or poorly prepared chisel.
Place the back of the chisel flat against the sharpening stone.
Do not hold it at an angle.
Move the blade across the stone while keeping the back flat.
Start with a suitable medium abrasive if the back needs significant work, then move to finer abrasives.
You do not necessarily need to polish the entire back of the chisel. The area immediately behind the cutting edge is the most important for establishing a flat reference surface.
How do you know when it is flat?
Look for an even scratch pattern across the working area.
The goal is a flat, consistent surface rather than simply making the entire back shiny.
Woodcraft’s sharpening guidance recommends flattening the back before honing the cutting edge.
Step 3: Hone the Primary Bevel
Now move to the bevel.
Place the bevel against the sharpening stone.
For a typical bench chisel, the primary bevel is commonly around 25°.
A honing guide can help beginners maintain this angle consistently.
Move the chisel back and forth across the stone.
Use even pressure.
Do not rock the chisel from side to side.
What are you trying to create?
You want a consistent bevel that reaches the cutting edge across the entire width of the blade.
If you are repairing a badly damaged edge, this step may require a coarser abrasive or grinding stage before normal honing.
Tip
Color the bevel lightly with a marker before honing.
As you sharpen, the disappearing marker helps you see whether the abrasive is contacting the bevel evenly. This is also a technique recommended in Woodcraft’s sharpening guidance.
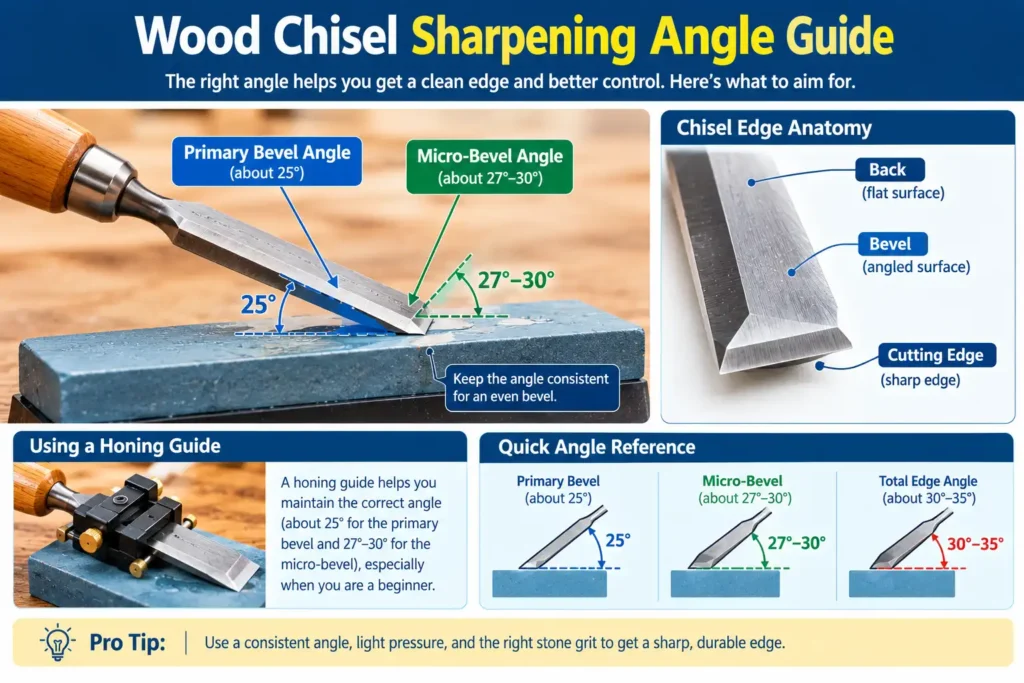
Step 4: Create and Hone a Micro-Bevel
Once the main bevel is established, you can create a small secondary bevel, often called a micro-bevel.
The micro-bevel is only a narrow strip at the very cutting edge.
For example:
Primary bevel: approximately 25°
Micro-bevel: approximately 27–30°
The exact angle is less important than creating a small, consistent secondary bevel.
A honing guide makes this easier.
Raise the angle slightly and make several controlled strokes on a finer sharpening stone.
Continue until the secondary bevel is visible across the entire cutting edge.
Woodcraft describes creating a secondary bevel a few degrees higher than the primary bevel—for example, moving from 25° to about 28°.
Why use a micro-bevel?
It gives you a small area to maintain during routine sharpening.
Instead of repeatedly reworking the entire primary bevel, you can refresh the small secondary bevel.
Step 5: Remove the Burr and Polish the Edge
As you hone the bevel, a small burr or wire edge can develop on the back of the blade.
This is normal.
To remove it:
- Place the back flat on a fine stone.
- Make several light strokes.
- Return to the bevel.
- Make a few light strokes.
- Repeat if necessary.
- Finish with very light strokes.
You can then use a leather strop with suitable honing compound if desired.
The goal is a clean edge without a remaining wire burr.
Woodcraft’s sharpening sequence recommends removing the burr by honing the flat back and then polishing the secondary bevel.
Once you understand how to sharpen a wood chisel, routine touch-ups become much easier.
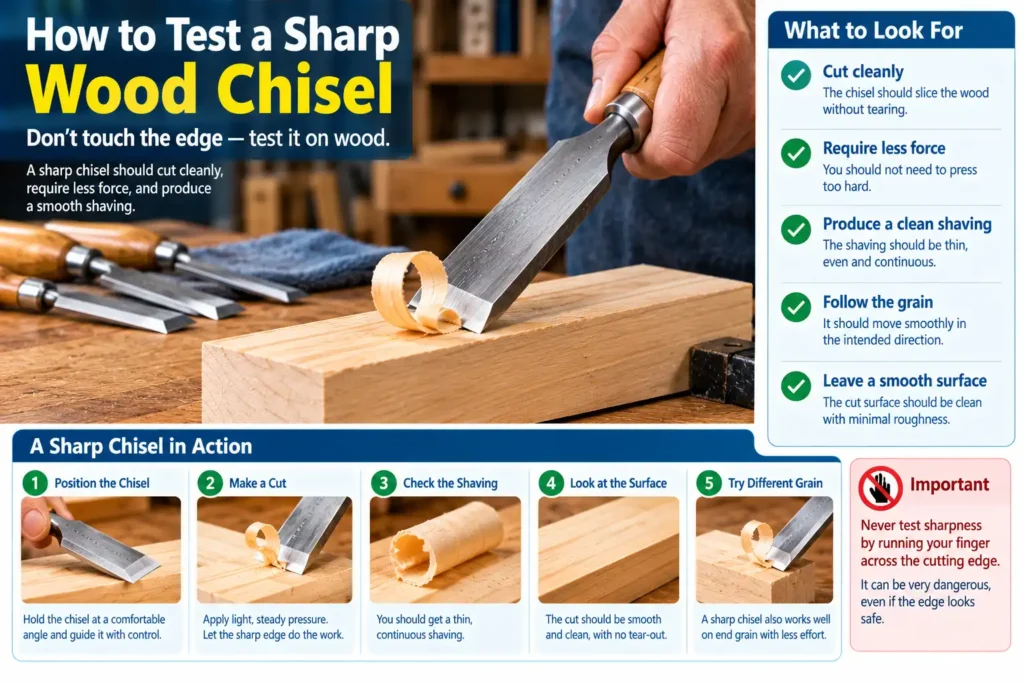
How to Test a Sharpened Wood Chisel
Do not test sharpness by running your finger across the cutting edge.
Instead, test the chisel on scrap wood.
A properly sharpened chisel should:
- Cut cleanly
- Require controlled pressure
- Produce a clean shaving
- Follow the intended direction
- Leave a relatively smooth surface
A sharp chisel should require less force and give you better control. Woodcraft also emphasizes that sharp chisels provide better control and cleaner results.
How to Know When Your Chisel Needs Sharpening
You do not need to wait until the chisel becomes completely dull.
Sharpen it when you notice:
- More force is needed
- Cuts become rough
- The edge starts skipping
- The chisel struggles with end grain
- The cutting edge becomes visibly rounded
- The tool no longer produces clean shavings
Regular light honing is usually easier than waiting until the edge is badly damaged.
Honing vs Sharpening: What’s the Difference?
These terms are sometimes used interchangeably, but they are not exactly the same.
Sharpening
Sharpening generally means removing enough material to establish or restore the cutting edge.
This may include:
- Grinding
- Primary bevel shaping
- Coarse honing
Honing
Honing refines an existing edge using finer abrasives.
It is what you will normally do during routine maintenance.
Simple rule
Damaged edge → sharpen/regrind
Slightly dull edge → hone
This distinction can save you time and avoid unnecessary removal of steel.
How Often Should You Sharpen a Wood Chisel?
There is no fixed schedule.
It depends on:
- How often you use the chisel
- The type of wood
- The amount of material removed
- The quality of the steel
- Your cutting technique
For normal hobby woodworking, inspect the edge regularly and hone it whenever performance begins to drop.
Frequent light maintenance is usually better than allowing the blade to become heavily dull.
Common Wood Chisel Sharpening Mistakes
1. Changing the angle constantly
An inconsistent angle makes it harder to create a clean bevel.
Use a honing guide if you are still learning.
2. Ignoring the back
A sharp bevel alone is not enough.
The back needs a proper flat reference surface near the cutting edge.
3. Using too much pressure
Heavy pressure does not automatically sharpen a chisel faster.
Controlled strokes and the correct abrasive are more important.
4. Starting with an unnecessarily coarse stone
If the edge only needs a touch-up, use a suitable finer abrasive.
Save aggressive grinding for damaged or significantly worn edges.
5. Leaving the burr
A remaining wire edge can make the chisel feel sharp temporarily but will not give you a clean, stable cutting edge.
Always remove it.
6. Over-polishing
Polishing is useful, but excessive polishing can round over the edge.
Keep the final strokes controlled and light.
Sharpening Stone Grit: What Should You Use?
You do not need every grit available.
A simple progression can work well:
| Abrasive | Main Purpose |
| Coarse | Repair damaged edges |
| Medium | Establish/refine bevel |
| Fine | Hone cutting edge |
| Extra-fine | Final refinement |
| Strop | Polish and remove remaining fine burr |
The exact grit numbers vary depending on the type of sharpening stone, manufacturer, and sharpening system.
Therefore, focus on the progression from coarse to fine rather than assuming one fixed grit sequence is correct for every system.
Water Stone, Oil Stone, or Diamond Stone?
Water stones
Pros:
- Fast cutting
- Available in many grits
- Excellent for woodworking
Cons:
- Some require flattening
- Need proper water management
Oil stones
Pros:
- Durable
- Traditional sharpening method
- Good for routine maintenance
Cons:
- Often slower
- Requires oil
Diamond stones
Pros:
- Fast
- Flat
- Low maintenance
- Good for harder steels
Cons:
- Higher initial cost for quality plates
- Aggressive plates can remove material quickly
Which should a beginner choose?
Any of these systems can work.
For a beginner, consistency and technique matter more than the brand or sharpening system.
Safety Tips When Sharpening a Wood Chisel
Always work carefully around a sharp blade.
- Wear eye protection when grinding.
- Keep your fingers away from the cutting edge.
- Secure your sharpening stone.
- Keep the work area dry and stable.
- Do not force the blade into a grinding wheel.
- Avoid overheating the blade during powered grinding.
- Follow the instructions for your sharpening system.
- Never test sharpness by touching the cutting edge.
If using a powered grinder, overheating can damage the temper of tool steel, so use controlled contact and allow the blade to cool as needed.
Knowing how to sharpen a wood chisel is useful, but you should also know when sharpening is actually necessary.
For a detailed look at the sharpening sequence, see this Woodcraft guide to sharpening chisels and other woodworking tools.
When Should You Use a Honing Guide?
A honing guide is particularly useful if:
- You are new to sharpening.
- You struggle to hold a consistent angle.
- You want repeatable results.
- You are sharpening several chisels.
Experienced woodworkers may sharpen freehand, but beginners often find a guide easier for learning consistent bevel control.
How to Maintain a Sharp Edge Longer
Good sharpening is only half the job.
You can extend the life of your edge by:
- Cutting with the grain when appropriate
- Avoiding nails and screws
- Using the correct chisel for the task
- Never using a woodworking chisel as a screwdriver
- Keeping the blade protected during storage
- Honing before the edge becomes badly dull
Proper storage and regular maintenance can help keep your chisels ready for the next project. See our guide to chisel maintenance and storage for more practical tips.
Frequently Asked Questions
What angle should I sharpen a wood chisel?
A general-purpose bench chisel commonly starts with a primary bevel around 25°. A small secondary bevel can then be honed at a slightly higher angle. The exact angle can vary by chisel type and intended use.
Can I sharpen a wood chisel without a honing guide?
Yes. Experienced woodworkers often sharpen freehand. However, a honing guide can make it easier for beginners to maintain a consistent angle.
What is the best sharpening stone for wood chisels?
There is no single best stone for everyone. Water stones, oil stones, and diamond stones can all produce excellent results when used correctly.
Should I flatten the back of a new chisel?
A new chisel may need some preparation of the back before it is ready for precise work. The goal is to establish a flat working area behind the cutting edge.
How do I know if my chisel is sharp?
Test it on scrap wood rather than touching the edge. A sharp chisel should cut cleanly with controlled pressure and produce a clean shaving.
How often should I sharpen my wood chisels?
How often you need to sharpen a wood chisel depends on how often you use it and the type of wood you cut.
Can I use sandpaper to sharpen a wood chisel?
Yes. Abrasive paper on a reliably flat surface can be used as part of a sharpening system. It is sometimes called the “scary sharp” method.
Final Thoughts
Learning how to sharpen a wood chisel is one of the most valuable skills for a beginner woodworker.
You do not need an expensive sharpening machine.
Start with:
- A suitable sharpening stone
- A flat chisel back
- A consistent bevel
- A small micro-bevel
- A clean, burr-free edge
With regular maintenance, your chisels will be easier to control and your woodworking cuts will become cleaner.
Remember: A good chisel becomes much more useful when you know how to maintain its edge.
If you are still building your first tool collection, read our guide to the best wood chisels for beginners next.
As an Amazon Associate, We earn from qualifying purchases. This helps support the blog at no extra cost to you. Thanks for your support!
Related Articles: