A small marking error can turn into a big problem when you are cutting, drilling, fitting, or shaping a workpiece. That is why accurate layout work matters.
Scribing tools are designed to create fine reference marks on materials such as metal and wood. Unlike a regular pencil line, a scribed line can provide a narrow physical reference that remains visible during many workshop tasks.
But not every scriber is designed for the same job.
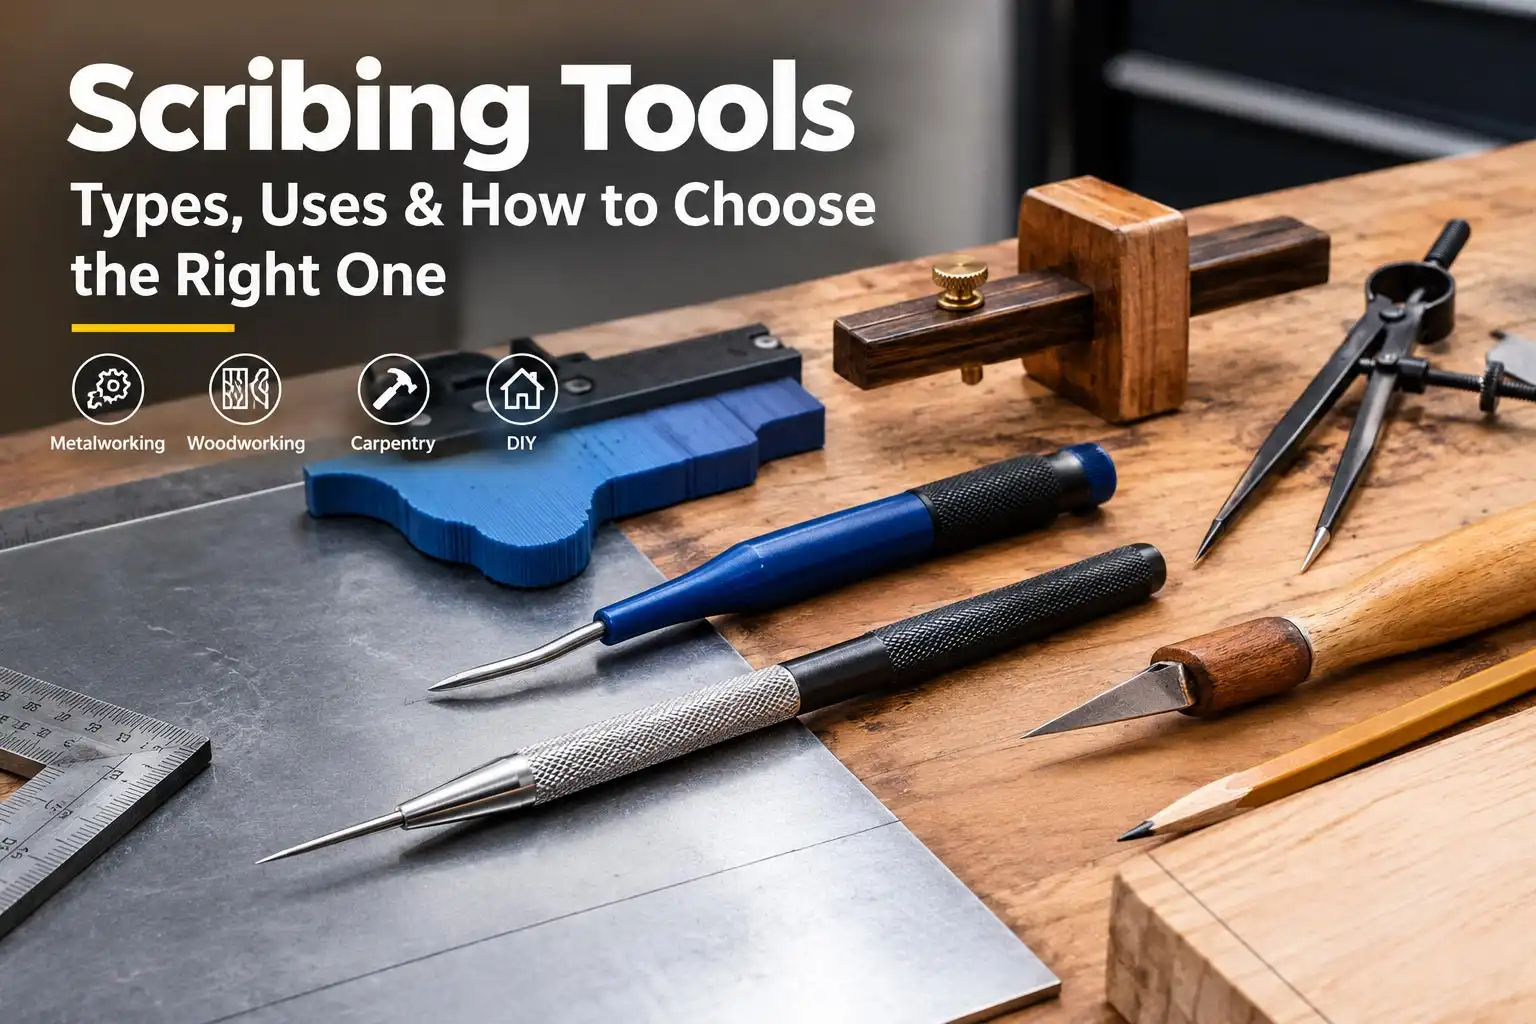
A pointed metal scriber is useful for metal layout work, while a marking knife is often better for fine woodworking. A profile scribing tool is useful when you need to transfer an irregular shape, and a pencil remains practical for quick general-purpose marking.
This guide explains what a scribing tool is, what it is used for, the main types of scribing tools, how to use one, and how to choose the right tool for your work.
Table of Contents
What Is a Scribing Tool?
A scribing tool, also called a scriber, is a marking tool with a pointed tip that creates a fine line or groove on a workpiece.
The tip is moved across the surface along a ruler, square, template, or another reference edge. Depending on the tool and material, the point can scratch or score the surface to create a precise reference mark.
Scribing tools are commonly used in:
- Metalworking
- Machining
- Woodworking
- Carpentry
- Cabinet installation
- Flooring
- General DIY projects
The main advantage is control. A fine scribe line can help you position a cut, hole, joint, or edge more accurately.
What Is a Scribing Tool Used For?
The primary purpose of a scribing tool is accurate marking before the next operation.
For example, you might use one to:
- Mark a cutting line on sheet metal
- Locate a hole before drilling
- Transfer a measurement to a workpiece
- Mark a reference line for machining
- Transfer the edge of a cabinet or countertop
- Mark a joint in woodworking
- Copy an irregular profile
- Create layout lines for fitting and trimming
The correct tool depends on the material and the type of mark you need.
A metal scriber, for example, is designed differently from a woodworking marking knife.
How Does a Scribing Tool Work?
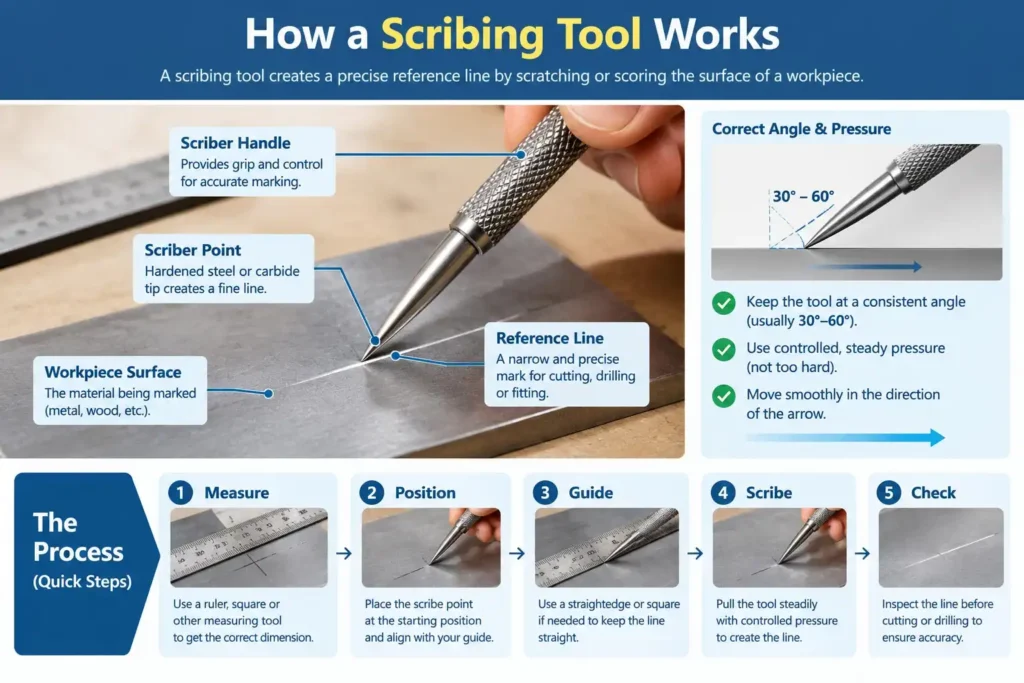
The basic principle is simple.
Scriber Point → Workpiece Surface → Fine Reference Line
A sharp point contacts the surface and is guided along a predetermined path. The resulting mark provides a reference for cutting, drilling, shaping, or fitting.
For good results:
- Measure the required dimension.
- Position the workpiece securely.
- Use a ruler, square, or other guide when appropriate.
- Place the scriber point accurately.
- Move the tool smoothly along the guide.
- Check the finished line before making the next operation.
The exact technique varies with the tool and material.
Types of Scribing Tools
There are several types of scribing and marking tools. Some are designed primarily for metalworking, while others are more suitable for woodworking or fitting work.
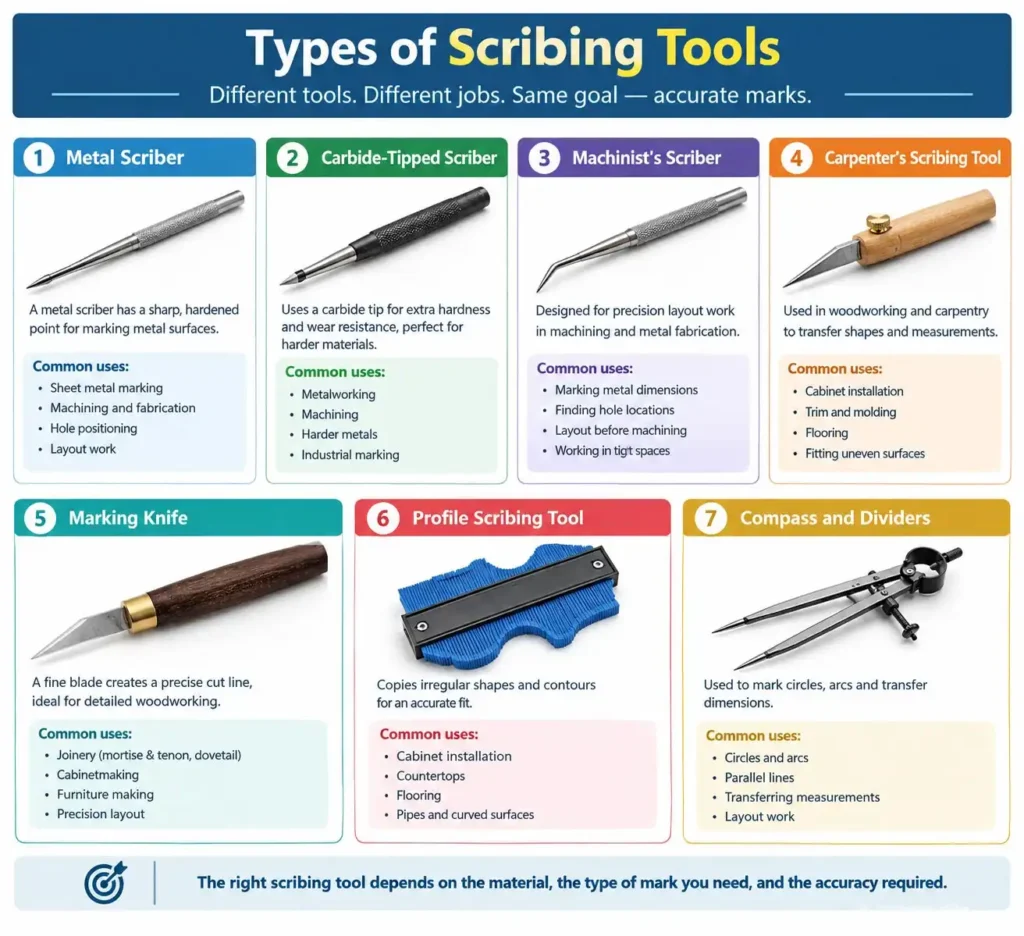
1. Metal Scriber
A metal scriber has a sharp pointed tip designed primarily for marking metal surfaces.
It is commonly used with a steel rule, square, or other layout tool to create reference lines before cutting, drilling, or machining.
Common uses:
- Sheet metal layout
- Machining
- Fabrication
- Hole location
- General metal layout
For more product-focused information, see our guide to best metal scribing tools.
2. Carbide-Tipped Scriber
A carbide-tipped scriber uses a carbide point rather than a conventional steel point.
Carbide is very hard and can provide good wear resistance. This makes carbide-tipped scribers useful when a durable point is important.
However, carbide does not automatically make a tool suitable for every material. Always consider the manufacturer’s intended application and the surface you are marking.
Common uses include:
- Metal layout
- General workshop marking
- Machining applications
- Materials where a durable point is useful
3. Machinist’s Scriber
A machinist’s scriber is designed for precision layout work in machining and metalworking.
Many have a slender pointed tip, and some models use a bent or angled point to reach areas that are difficult to access with a straight tool.
They can be useful for:
- Marking dimensions
- Locating holes
- Transferring measurements
- Layout before machining
- Marking in restricted spaces
The shape of the point and handle should be selected according to the type of work you perform.
4. Carpenter’s Scribing Tool
A carpenter’s scribing tool is used to transfer the shape or position of one surface onto another material, particularly during fitting work.
For example, when installing cabinets against an uneven wall, a scribing tool can help transfer the wall’s profile to the cabinet or filler piece.
Typical applications include:
- Cabinet installation
- Trim work
- Flooring
- Fitting around uneven surfaces
- Woodworking projects
If your main interest is woodworking, you can also see our guide to best carpenter’s scribing tool for woodworking.
5. Marking Knife
A marking knife is not technically the same tool as a pointed metal scriber, but it performs a similar layout function in woodworking.
Instead of scratching the surface with a pointed metal tip, the blade creates a fine cut line.
This can be especially useful for:
- Joinery
- Mortise and tenon work
- Dovetails
- Cabinetmaking
- Marking across wood grain
For fine woodworking, a marking knife can provide a very clear reference line.
6. Profile Scribing Tool
A profile scribing tool is designed to copy irregular shapes and contours.
One common example is a contour-style profile gauge. Its movable pins conform to the shape of an object, allowing you to transfer that profile to another material.
These tools are useful when fitting materials around:
- Pipes
- Curved walls
- Door frames
- Countertops
- Flooring
- Irregular surfaces
They are particularly useful when a simple ruler cannot accurately describe the shape you need to transfer.
7. Compass and Dividers
Dividers and scribing compasses can be used to mark circles, arcs, and transfer dimensions.
They are useful when the layout requires a controlled radius or when a measurement needs to be transferred from one location to another.
Typical applications include:
- Circles
- Arcs
- Layout work
- Transferring dimensions
- Precision marking
Scribing Tool vs. Pencil
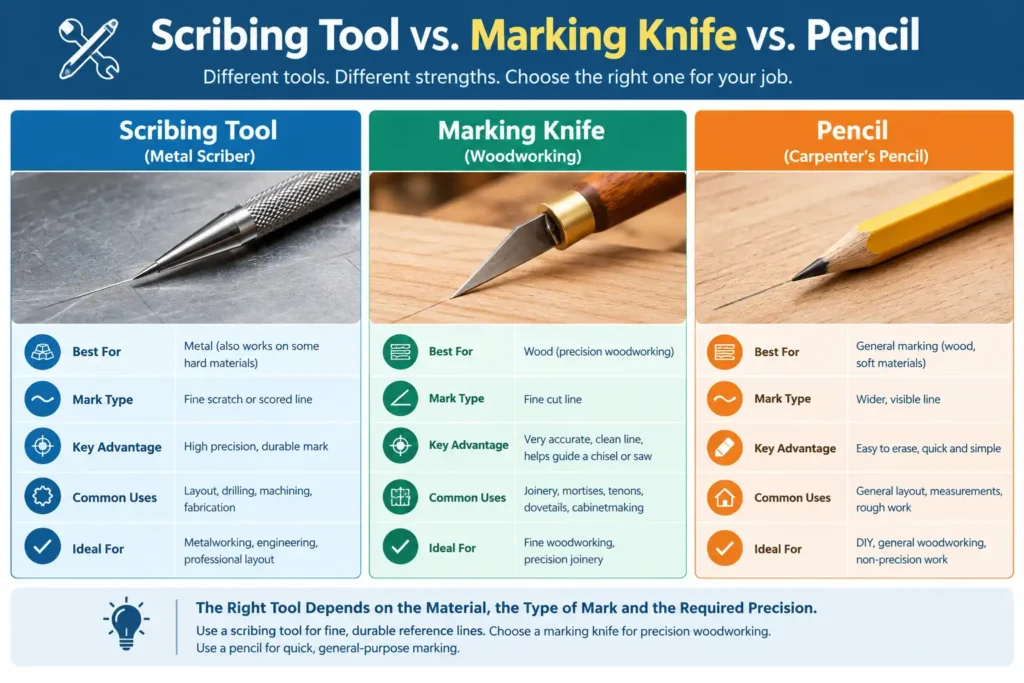
A pencil is excellent for fast, visible, and easily removable marks. A scriber creates a much finer physical reference mark.
| Feature | Scribing Tool | Pencil |
| Mark | Fine scratch/score | Graphite line |
| Best for | Precision layout | General marking |
| Metal | Excellent with suitable tool | Limited |
| Wood | Depends on tool | Very practical |
| Easy to erase | No | Yes |
| Fine reference line | Excellent | Good |
| Speed | Moderate | Fast |
For metalworking, a suitable scriber is often more appropriate. For quick measurements and rough layout, a pencil is usually simpler.
Scribing Tool vs. Marking Knife
A marking knife and scriber can both create precise reference marks, but they are normally used differently.
Scriber:
Primarily useful for metal layout and certain specialized marking tasks.
Marking knife:
Particularly useful for precision woodworking because the blade creates a fine cut line in the wood.
If you are marking a mortise, tenon, dovetail, or other fine wood joint, a marking knife is often a better choice than a traditional metal scriber.
How to Use a Scribing Tool
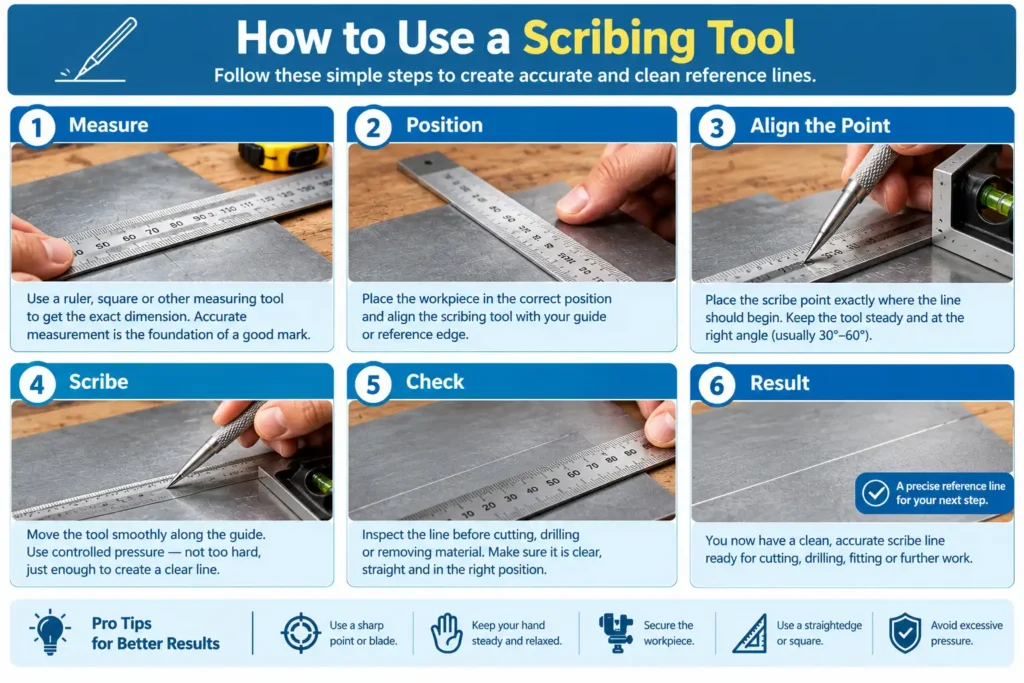
Using a scriber correctly is more important than simply having a sharp tool.
Step 1: Measure
Use a ruler, square, caliper, or another suitable measuring tool to establish the correct dimension.
Step 2: Position
Place the workpiece securely and position your reference edge or guide.
Step 3: Align the Point
Place the scriber point exactly where the line should begin.
Step 4: Guide the Tool
Use a straightedge or square when you need a straight line.
Step 5: Scribe
Move the tool smoothly along the intended path. Use controlled pressure rather than forcing the point into the material.
Step 6: Check
Inspect the line before cutting, drilling, machining, or removing material.
How to Get More Accurate Scribe Lines
Small technique improvements can make a noticeable difference.
Use a sharp point
A worn or damaged point can produce a wider or less consistent mark.
Secure the workpiece
Movement during marking can cause inaccurate lines.
Use a guide
A steel rule, square, or other suitable straightedge can help keep the line consistent.
Avoid excessive pressure
A sharp point generally requires less force. Excessive pressure can make the tool harder to control.
Measure twice
Confirm the dimension before creating a permanent physical mark.
Make one clean pass when practical
Repeated passes can make the line wider or less precise, depending on the material.
Scribing Tools for Different Materials
Scribing Tools for Metal
For metalworking, pointed metal scribers are common choices.
Depending on the material and application, you may choose a conventional hardened-steel point, carbide-tipped point, or specialized machinist’s scriber.
Consider:
- Material hardness
- Required line visibility
- Tip durability
- Access to the marking area
- Required precision
Scribing Tools for Wood
Woodworking requires a slightly different approach.
A marking knife is often useful when a very fine cut line is needed. A sharp pencil can be more practical for general layout.
Some specialized woodworking scribing tools are designed for transferring edges and profiles rather than simply creating straight lines.
Scribing Tools for Cabinet Installation
Cabinet installation often involves fitting materials against walls or other surfaces that are not perfectly straight.
A profile scribe or specialized carpenter’s scribing tool can help transfer these irregular shapes.
This can reduce the amount of trial-and-error trimming required.
Scribing Tools for DIY Projects
For general DIY work, you may not need a specialized tool for every task.
A useful basic setup might include:
- Pencil
- Steel ruler
- Combination square
- Marking knife
- General-purpose scriber
Choose based on the materials you work with most often.
How to Choose the Right Scribing Tool
Before buying a scriber, consider these factors.
1. What material are you marking?
Metal, wood, plastic, and other materials may require different marking methods.
2. How precise must the mark be?
For rough layout, a pencil may be enough. For precision machining or fine joinery, a dedicated marking tool is more appropriate.
3. What type of line do you need?
A straight reference line, a fine cut line, a circle, or an irregular profile may each require a different tool.
4. How much access do you have?
A bent or angled scriber can be useful in areas where a straight point is difficult to position.
5. How often will you use it?
For occasional DIY work, a simple tool may be sufficient. Frequent workshop use can justify a more specialized design.
6. Is the point replaceable?
Some scribers have replaceable points. This can be useful if the tool will receive regular use.
7. Is the handle comfortable?
Good grip and control matter, especially when making long or detailed marks.
For a broader guide on selecting a tool, see how to choose the right scribing tool.
Common Scribing Mistakes to Avoid
Even a good tool can produce poor results when used incorrectly.
Marking before checking the measurement
Always confirm the dimension before making the physical mark.
Using the wrong tool
A metal scriber is not automatically the best choice for woodworking. Similarly, a pencil may not provide the required reference on metal.
Applying too much pressure
Excessive force can make the tool harder to control.
Failing to secure the workpiece
Movement can change the position of the line.
Using a damaged point
A blunt or damaged point can reduce accuracy.
Ignoring the material
Different materials respond differently to scratching, scoring, cutting, and pencil marking.
How to Maintain a Scribing Tool
Proper maintenance is simple.
- Keep the point clean.
- Protect sharp tips when storing the tool.
- Check the point regularly for damage.
- Keep metal tools dry to reduce corrosion.
- Replace damaged or worn points when appropriate.
- Store precision marking tools where they will not be knocked against other tools.
For a fixed steel point, sharpening should be done carefully and according to the tool’s design. Removing too much material can change the shape of the point.
Scribing Tool vs. Scratch Awl
A scratch awl is another pointed marking tool, but its design and typical applications differ from those of a dedicated scriber.
An awl is commonly used for tasks such as:
- Starting holes
- Marking wood
- Punching or enlarging small openings
- Leatherworking
- General layout
A scriber is generally designed more specifically for creating fine reference lines.
You can learn more about the scratch awl and its uses.
Scribing Tools vs. Other Marking Tools
| Tool | Best suited for | Type of mark |
| Metal scriber | Metal layout | Fine scratch/score |
| Carbide scriber | Durable precision marking | Fine scratch/score |
| Machinist’s scriber | Machining layout | Fine reference line |
| Marking knife | Fine woodworking | Cut line |
| Carpenter’s scribe | Fitting and woodworking | Transferred reference |
| Profile scribe | Irregular shapes | Profile/outline |
| Dividers | Circles and dimensions | Arc/circle |
| Pencil | General marking | Graphite line |
| Scratch awl | Starting holes and marking | Point mark |
The important point is that there is no single scribing tool that is ideal for every job.
Best Scribing Tool for Different Jobs
Instead of asking which tool is universally best, match the tool to the task.
| Job | Tool to consider |
| Sheet metal layout | Metal scriber |
| Precision metal layout | Machinist’s scriber |
| Frequent metal marking | Carbide-tipped scriber |
| Fine wood joinery | Marking knife |
| Cabinet fitting | Carpenter’s scribing tool |
| Irregular profiles | Profile scribing tool |
| Circles and arcs | Dividers or compass |
| Quick general marking | Pencil |
| Starting small holes | Scratch awl |
Your material, required accuracy, and working conditions should determine the final choice.
FAQs About Scribing Tools
What is a scribing tool used for?
A scribing tool is used to create fine reference marks on a workpiece before cutting, drilling, machining, shaping, or fitting.
What is the difference between a scriber and a pencil?
A scriber creates a fine physical scratch or score, while a pencil leaves a graphite mark that is easier to erase.
What is the best scribing tool for metal?
A suitable metal scriber or machinist’s scriber is commonly used for metal layout. The best choice depends on the material, required accuracy, and application.
What is the best scribing tool for woodworking?
For fine woodworking, a marking knife is often useful because it creates a precise cut line. A dedicated carpenter’s scribing tool may be more appropriate for fitting and profile-transfer work.
Can a scribing tool be used on wood?
Some scribing tools can mark wood, but the appropriate choice depends on the task. For fine joinery, a marking knife is often better suited.
Is a carbide scriber better than a steel scriber?
Not universally. A carbide tip can offer good wear resistance, but the best material depends on the application, workpiece, and manufacturer’s intended use.
How do you sharpen a scribing tool?
Sharpening depends on the point design. A suitable abrasive can be used for some steel points, while replaceable or carbide tips may require replacement or a specific sharpening method.
What is the difference between a scribing tool and a marking gauge?
A scriber can create a fine reference line by following a guide or reference edge. A marking gauge uses a fixed fence and cutter or pin to create a line at a controlled distance from an edge.
Do I need an expensive scribing tool?
Not necessarily. A basic, well-made tool can handle many jobs. More specialized tools help when you need specific access, durability, or precision.
Are scribing tools the same as scratch awls?
No. They are similar because both have pointed ends, but they are designed for different tasks. A scriber is primarily a precision marking tool, while a scratch awl is commonly used for marking points and starting holes.
Related Article:
- 5 Best Carpenters Scribing tool for Easy and Precise Marking
- Choose the Best Scribing Tool for Marking the Measurement of Your Job
- Scribe Molding: Improve the Look and Performance of Cabinets
- 5 Best Mechanical Carpenter Pencils for Accuracy Measurement
- What Are Metal Scribing Tools, and How Are They Used? (6 Quick Steps)
By Hasan