Are you interested in how to use a flaring tool? Look no further! The process is easy, and this step-by-step guide shows you how to do it.
Using a flare tool to make leak-free connections is easy for beginners and DIYers. So, let’s dive in and discover the secrets of this essential skill!
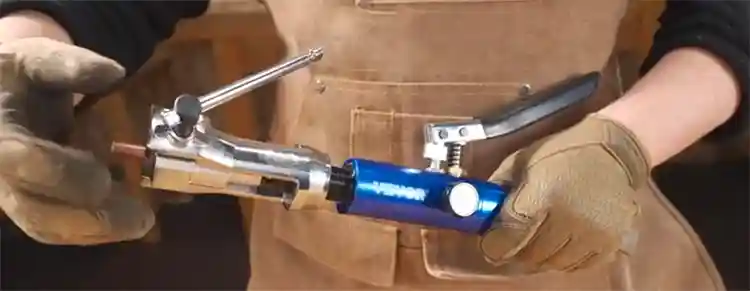
Table of Contents
Importance of Flaring Tools: Ensuring Leak-Free Connections
Flaring tools are essential in plumbing and automotive work because they help create strong connections that don’t leak. These tools shape the end of pipes or tubing into a flare, allowing for secure and reliable joints.
Using flaring tools, you can ensure that your connections are solid and won’t cause any issues. These tools are essential for leak-free connections and project integrity while working on plumbing or brake lines.
Common Applications for Flaring Tools
Flaring tools are extensively used in various applications in the automotive and plumbing industries. These versatile tools are designed to create secure and leak-free connections, making them essential for various projects.
Here are some typical applications where flaring tools are frequently utilized:
Plumbing Systems: Plumbers need flare tools to connect copper pipes. Plumbers use them to make solid and leak-proof couplings.
Air Conditioning and Refrigeration: Flaring tools join air conditioning and refrigeration copper tubing. These connectors keep refrigerant flowing and avoid leaks that lower efficiency.
Hydraulic Systems: Hydraulic systems require precise and leak-proof flare tools. They flare steel or stainless steel tubing to create safe, secure couplings for high-pressure hydraulic fluids.
Brake Line Connections: Flaring tools are essential for automotive brake line applications. These tools seal brake tube ends with two flares to resist braking system pressures.
Fuel Lines and Oil Circuits: Assure leak-free fuel lines and oil circuit connections for safety and efficiency. They help mechanics make joints tolerate fuel or oil flow without compromise.
Natural Gas and Propane Systems: Flaring tools install and maintain propane and natural gas systems. They secure copper and steel tubes for safe and efficient gas transport.
Automotive Fluid Transfer: These tools join the transmission cooler and power steering lines. These tools help mechanics make reliable connections that endure fluid circulation pressures.
These tools allow specialists to make leak-free connections, assuring system safety, efficiency, and lifespan. Please use the right flaring tool correctly for the best results.
Types of Flaring Tools: Exploring Different Options
Flaring tools come in various types and designs, each catering to specific applications and materials.
Understanding the tools available can help you choose the right tool for your project. Here are some commonly used types of flaring tools:
Single Flare Tool: “Single flare” or “single lap flare” tools are vital and straightforward. Pressing the tube against a conical surface makes a single flare. Low-pressure applications like copper tubing employ single flares.
Double Flare Tool: “Double lap flare” or “bubble flare” tools strengthen connections. It shapes the tubing end into two flared portions to create a double flare. Double flares strengthen and resist vibration and pressure, making them popular in brake lines.
Hydraulic Flaring Tool: Hydraulic flares are automatic and more advanced. These tools are suited for high-volume production or professional use due to their precision and consistency. Industrial hydraulic flaring tools are utilized for efficiency and accuracy.
Swaging Tool: Though not a flaring instrument, it serves a similar purpose. Swaging tools narrow pipes and tubes to fit within other tubes and fittings. In some cases, swaging can replace flaring for pipe joining and connecting.
Eccentric Cone Flaring Tool: Eccentric cones are made for stainless steel tubing. An eccentric cone gives the tool a precise flare without work hardening or deforming stainless steel. These tools are used in the food, beverage, and drug businesses.
Quick-Connect Flaring Tools: These tools are efficient and straightforward. They allow quick and easy flare, excellent for professionals working on time-sensitive tasks. These tools simplify flaring using ratcheting or quick-release mechanisms.
Flaring and Swaging Combo Tools: Flaring and swaging combo tools are versatile. These tools suit people who must make multiple connections with one tool. They simplify dealing with varied materials and connection methods.
Consider application, materials, and connection type when choosing a flare tool. To get the best results, follow the tool’s instructions.
Understanding flare tools help you choose wisely and ensure project success.
Benefits of Flaring Tools: Achieving Reliable and Leak-Free Connections
Flaring tools provide plumbing and automotive experts and DIYers with a dependable and quick way to connect. Flaring instruments have several advantages:
Leak-Free Connections: These seal pipe-tubing connections. The gadget prevents leaks by flaring the tubing’s termination.
Enhanced Strength: Flared connections are stronger than others. The flared end spreads the load in high-pressure or vibration applications, reducing joint failure or separation.
Versatility: Flaring tools work with copper, steel, and stainless steel tube. Their adaptability lets them meet project needs and materials.
Standardized Connection Method: Flaring tools standardize and professionalize connections. Flares meet industrial requirements, assuring compatibility with fittings, valves, and other components. Standardization streamlines installation and ensures project uniformity.
Cost-Effective: Flaring tools make connections cheaply. These tools minimize the need for solder and adhesives, lowering project costs. Flared connectors last longer and require less maintenance.
Compatibility with Different Systems: Plumbing, HVAC, refrigeration, automotive, and hydraulic systems use flared connectors. Flaring instruments are helpful because of their flexibility.
Professional-Level Results: These tools let DIYers attain professional results. Flared connections are precise and reliable, ensuring excellent performance.
Ease of Use: Flaring tools make easy connections for beginners and experts. These tools may be learned quickly and confidently with coaching and practice.
Flaring tools provide industry-standard, leak-free connections. These tools strengthen connections, are versatile across materials and systems, and are cost-effective for many applications.
Flaring tools help pros and DIYers prolong and improve plumbing and automotive installations.
How to Use a Flaring Tool?
Flaring tools are valuable devices used in plumbing and automotive applications to create solid and leak-free connections between pipes and tubing.
Whether you’re a pro or a DIY enthusiast, mastering a flaring tool can be incredibly useful. Follow this step-by-step guide to learn how to use a these tool effectively:
Step 1:
Gather Supplies Gather supplies before starting. You will need a flaring tool, tubing cutter, deburring tool, tubing, and appropriate fittings for your project. Use suitable tubing for your application.
Step 2:
Prepare the Tubing Start by preparing the tubing for flaring. Thoroughly clean the tubing to remove any dirt, debris, or oils that could interfere with flaring. Cut the tubing using a tubing cutter to the desired length. Ensure that the tubing end is straight and free from burrs or rough edges by using a deburring tool.
Step 3:
Set Up the Flaring Tool Now; it’s time to set up the tool. Attach the appropriate flaring die or adapter to the tool based on the size and type of tubing you are working with. If applicable, adjust the tool to the desired flare size following the manufacturer’s instructions.
Step 4:
Secure the Tubing Insert the prepared tubing into the flaring tool’s clamp or holder. Tighten the clamp or holder to hold the tubing in place securely. Ensuring the tubing is centered and aligned correctly with the flaring cone is important.
Step 5:
Begin the Flaring Process. Align the flaring cone with the tubing end. Start rotating the handle or operating the tool per the manufacturer’s instructions. Apply steady and even pressure while turning the handle. Continue turning until the desired flare is achieved.
Step 6:
Inspect the Flare After flaring the tubing, inspect the flare for quality. A high-quality flare should be smooth, uniform, and free from cracks or deformations. Ensure that the flare matches the required specifications for your application. If necessary, make any adjustments or corrections to achieve the desired result.
Step 7:
Release and Remove the Flared Tubing Once you’re satisfied with the flare, release the clamp or holder to free the flared tubing from the tool. Carefully remove the flared tubing, ensuring you don’t damage the flare during the process.
Step 8:
Test the Flared Tubing Before installing the flared tubing; it’s crucial to test its functionality. Use a fitting or connection to ensure a proper seal and functionality. Following specific testing procedures or guidelines provided by the manufacturer is highly recommended.
Following these step-by-step instructions, you can confidently use a flaring tool to create solid and reliable connections in your plumbing and automotive projects.
Remember to prioritize safety, choose the correct tubing, prepare it properly, and inspect the flare for quality.
With practice and experience, you’ll become proficient in using a flaring tool and achieve professional-grade results.
Maintenance and Storage of Flaring Tools: Keeping Your Tools in Top Shape
Proper maintenance and storage of flaring tools are essential to ensure their longevity and optimal performance. Follow these simple steps to maintain your tools:
Cleaning: After each use, clean your flaring tools thoroughly to remove any debris, metal shavings, or residue. Remove dirt and oil with a brush or cloth. Pay special attention to the flaring cone and other moving parts. Cleaning the tools will prevent build-up and corrosion, maintaining their functionality.
Lubrication: Apply a light coat of lubricant to the moving parts of the flaring tool. This helps reduce friction and allows for smooth operation. Use a lubricant recommended by the manufacturer to ensure compatibility with the tool’s materials.
Inspection: Regularly inspect your flaring tools for any signs of wear, damage, or misalignment. Check for loose screws, bent handles, or worn-out components. Address any issues promptly to avoid further damage or compromised performance.
Storage: Store your flaring tools in a clean, dry, and secure location. Moisture and humidity can lead to rust or corrosion, so ensure the storage area is free from excess moisture. Consider using a protective case or toolbox to prevent dust accumulation and accidental damage.
Proper Handling: Handle your flaring tools carefully and avoid excessive force or impact. Dropping or mishandling the tools can cause misalignment or damage to critical parts. Always use the tools for their intended purpose and avoid using them for tasks they are not designed for.
Periodic Maintenance: Follow the manufacturer’s recommendations for periodic maintenance tasks. This may include tightening screws, lubricating specific parts, or replacing worn-out components. Regular maintenance ensures that your flaring tools remain in optimal condition and perform consistently.
Professional Servicing: If you encounter persistent issues or complex repairs, it’s best to seek professional servicing. Trained technicians can diagnose and address any underlying problems with your flaring tools, ensuring their proper functioning and extending their lifespan.
By implementing these maintenance and storage practices, you can prolong the life of your flaring tools and maintain their performance over time.
Well-maintained tools deliver better results and provide excellent reliability and safety during your plumbing or automotive projects.
Troubleshooting Tips for Flaring Tools: Overcoming Common Challenges
While using these tools, it’s not uncommon to encounter specific challenges that can affect the flares’ quality or the tool’s overall performance.
Here are some troubleshooting tips to help you overcome common issues and achieve optimal results. As a result, you can properly know how to use a flaring tool.
Uneven Flares: If you notice that your flares are uneven, it could be due to improper alignment or insufficient pressure during the flaring process. Ensure that the tubing is centered and appropriately aligned with the flaring cone, and apply consistent pressure while rotating the handle or operating the tool. This will help create symmetrical and uniform flares.
Leaks at the Connection: If you’re experiencing leaks at the flared connection, it’s crucial to assess the quality of the flare. Check for any cracks, deformations, or rough edges on the flared end of the tubing. Trim the flare slightly to create a clean and smooth surface if necessary. Additionally, ensure the tubing is correctly inserted into the fitting or connection and securely tightened to achieve a tight seal.
Difficulty in Removing Flared Tubing: If you’re having trouble removing the flared tubing from the flaring tool, it may be due to the excessive tightness of the clamp or holder. Loosen the clamp slightly to release the tubing without excessive force, which could damage the flare. Applying a small lubricant or light oil to the flaring cone can facilitate removal.
Rough or Burrs on Flared End: If the flared end of the tubing has rough edges or burrs, it can affect the quality of the connection. To overcome this issue, use a deburring tool or file to remove imperfections and create a smooth surface. This will make sure it fits right and stop leaks.
Inadequate Flare Size: If the flare size is not meeting the required specifications, it may be due to incorrect adjustments of the flaring tool. Consult the manufacturer’s instructions to set the flaring tool for the desired flare size correctly. Ensure that the appropriate flaring die or adapter is attached to the tool, and make necessary adjustments as per the tubing size and type.
Excessive Material Removal: If the flaring tool removes excess material from the tubing, it can weaken the connection and affect its integrity. To prevent this, double-check the depth of the flaring cone or the adjustment settings on the tool. Adjustments should allow for the precise shaping of the flare without removing excessive material.
Rough Handling of Flaring Tool: Improper handling of the flaring tool can lead to subpar results and potential damage to the tool itself. Always handle the tool with care, avoiding excessive force or impact. Regularly clean and maintain the tool, removing debris or shavings after each use to ensure longevity and optimal performance.
Remember, troubleshooting tips vary based on the flaring tool and application. Consulting the manufacturer’s instructions and seeking expert advice when facing persistent issues is always recommended.
By addressing these common challenges, you can overcome obstacles and achieve consistent, high-quality flares with your flaring tool.
Conclusion
Using a flaring tool holds immense value in plumbing and automotive work. By following this comprehensive guide, you can confidently establish robust and leak-free connections with flared tubing.
Remember to prioritize safety, select appropriate tubing, adequately prepare it, and meticulously inspect the flare’s quality.
With practice and experience, you will master using a flaring tool, achieving professional-grade outcomes in your projects.
Choose Quick, Precise, and 50% Lighter Flaring Tools Black Max BFT850 Ultra-Lightweight R-410A Clutch-Type Ecentric Flaring Tool
FAQs
Q: What is the process of flaring?
A: Flaring is the process of shaping the end of a tube into a flare shape to create a secure connection. It involves using a flaring tool to gradually expand the tube’s end, forming a flare that can fit into another component or connect with another tube.
Q: How do you use a flaring and swaging tool?
A: Flaring and swaging tools are used to flare and expand the end of the tubing. The method may change depending on the specific tool and its features. Generally, use a flaring and swaging tool:
- Set up the tool according to the manufacturer’s instructions.
- Insert the tubing into the appropriate holder or clamp.
- Follow the specific instructions for flaring or swaging the tubing.
- Adjust the tool as needed to achieve the desired results.
- Release the tubing from the tool and inspect the flare or swage.
Q: What are the functions of flaring tools?
A: These tools serve the following functions:
- Creating flares on the end of the tubing to facilitate secure connections.
- Expanding tubing for fittings or connections.
- Ensuring leak-free and reliable joints in plumbing and automotive applications.
- Providing a professional and standardized method for tubing preparation.
Q: What are the main parts of a flaring tool?
A: The main parts of a these tool typically include:
- Clamp or holder: Secures the tubing in place during the flaring process.
- Flaring cone: Guides the shaping of the tubing’s end into a flare.
- Handle: The user can operate the tool and apply the necessary force.
- Adjusting mechanism: Enables the adjustment of the tool for different tubing sizes or flare types, if applicable.
Q: What are the two types of flaring tools?
A: The two common types of tools are:
- Single-flare tools: These tools create a single flare on the end of the tubing, which is suitable for specific applications.
- Double-flare tools: These tools produce a double flare on the tubing, providing a more robust and secure connection, commonly used in automotive brake lines.