Are you ready to unlock how to use an oscillating tool? In this beginner’s guide, we will delve into the world of oscillating tools and equip you with the knowledge to tackle various DIY projects and home renovations.
From plunge cuts to removing old paint, we’ll explore how this versatile power tool works and discover the different types of blades and their applications. Let’s dive in and learn how to make precise cuts and accomplish tasks efficiently with an oscillating tool.
Table of Contents
Understanding: How to Use an Oscillating Tool?
What is an Oscillating Tool?

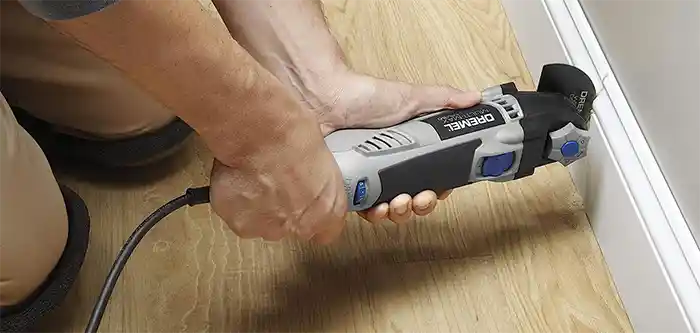
An oscillating tool (Dremel MM50-01 Multi-Max Oscillating DIY Tool Kit) is a versatile power tool that utilizes a rapid side-to-side oscillating motion to perform various tasks. It is commonly called an oscillating multitool due to its ability to accommodate various attachments, making it suitable for cutting, sanding, scraping, and more.
Types of Oscillating Tools and Their Applications:
Different oscillating multi tools are available, each designed to cater to specific needs and applications. Some popular types include corded oscillating tools, cordless oscillating tools, and pneumatic oscillating tools.
Corded oscillating tools:
An electrical cord powers these and provides a consistent power supply, making them ideal for heavy-duty tasks requiring continuous operation. They are commonly used in construction, carpentry, and remodeling projects.
Cordless oscillating tools:
These tools operate on rechargeable batteries, offering increased mobility and flexibility. They are perfect for projects requiring maneuverability or limited access to a power source. Cordless oscillating tools are commonly used in DIY projects and small-scale renovations.
Pneumatic oscillating tools:
Also known as air-powered oscillating tools, these tools are powered by compressed air. They are often used in professional settings, such as automotive repair, where a reliable compressed air source is available.
Key Components and Accessories:
An oscillating tool consists of several key components that contribute to its functionality:
- Motor: The motor generates the oscillating motion and powers the tool’s attachments.
- Oscillating Mechanism: This mechanism converts the rotational motion of the motor into a side-to-side oscillating motion.
- On/Off Switch: The switch allows you to control the tool’s operation.
- Speed Control: Many oscillating tools feature variable speed settings, enabling you to adjust the tool’s speed based on the task.
- Attachment Mount: The attachment mount lets you quickly and securely attach various accessories, such as cutting blades, sanding pads, and scrapers.
- Dust Collection: Some oscillating tools have dust collection features to minimize airborne dust and debris during sanding or cutting.
Accessories or attachments for an oscillating tool include:
- Cutting blades: These come in different shapes and sizes, suitable for cutting wood, metal, and plastic.
- Sanding pads: Used for sanding and smoothing surfaces, sanding pads come in different grits to achieve different levels of smoothness.
- Scrapers: Attachable scrapers are perfect for removing old paint, adhesive residues, or caulk.
- Grinding attachments: These attachments enable grinding and shaping tasks.
- Grout removal blades: Specifically designed for removing grout between tiles, these blades make tile renovation projects easier.
- Flush cutting blades: Ideal for making precise cuts flush against surfaces.
Understanding these components and accessories will help you make the most out of your oscillating tool and select the appropriate attachments for different tasks.
Safety Precautions
Protective Gear and Equipment:
When using an oscillating tool, it is essential to prioritize safety by wearing appropriate protective gear. This may include safety goggles to protect your eyes from flying debris, gloves to provide a firm grip and protect your hands, and ear protection if the tool generates a loud noise. Additionally, consider wearing a dust mask to prevent the inhalation of dust particles when sanding or cutting specific materials.
Workspace Preparation:
Before starting any project with an oscillating tool, it is essential to prepare your workspace. Clear the area of any clutter or obstacles that may impede your movement or cause accidents. Ensure that the work surface is stable and secure. Consider using protective mats or covering to prevent damage if working on a delicate surface.
Handling and Operating the Oscillating Tool Safely:
Handle the oscillating tool with care and follow these safety guidelines:
- Read the manufacturer’s instructions and familiarize yourself with the tool’s operation before use.
- When changing blades or adjusting, disconnect or remove the battery.
- Use both hands to maintain control and stability while operating the tool.
- Avoid overexertion or applying excessive force, as this may lead to loss of control.
- Keep your hands, fingers, and other body parts away from the blade or attachment during operation.
- Always turn off the tool and unplug it when not in use or during blade changes.
Essential Functions and Uses
Cutting and Trimming:
One of the primary functions of an oscillating tool is cutting and trimming various materials. An oscillating tool can make precise cuts in wood, drywall, pipes, and plastic with the appropriate cutting blade attached.
Sanding and Smoothing:
The oscillating tool, equipped with a sanding pad or attachment, can smooth surfaces. It is beneficial for reaching tight corners or irregular shapes that may be challenging with other sanding tools.
Scraping and Removing Materials:
Attachments like scrapers allow an oscillating tool to scrape away old paint, adhesive residues, or caulk from surfaces. The tool’s oscillating motion makes the scraping process more efficient and less labor-intensive.
Grinding and Polishing:
An oscillating tool can use appropriate grinding attachments to tackle grinding metal, sharpening blades, or polishing surfaces. It offers versatility in achieving different levels of grinding or polishing based on the attachment used.
Choosing the Right Blade or Attachment
Blade Materials and Types:
Oscillating tool blades come in various materials, including high-speed steel (HSS), bi-metal, carbide-tipped, and diamond-coated blades. Each material has its strengths and is suitable for specific tasks. For example, HSS blades are great for cutting wood and plastic. In contrast, carbide-tipped blades excel at cutting through nails or hardened materials.
Selecting the Appropriate Blade for Specific Tasks:
Consider the material you will work with and the desired outcome when choosing a blade. For cutting wood, choose a wood-cutting blade with fine teeth. Use a blade with more aggressive teeth or a specialized metal-cutting blade for metal. Matching the blade to the task at hand ensures efficient and precise cutting.
Changing Blades Safely and Efficiently:
To change the blade on an oscillating tool, follow these steps:
- Ensure the tool is turned off and unplugged or the battery is removed.
- Locate the blade release lever or screw near the tool’s attachment area.
- Depress the release lever or loosen the screw to remove the old blade.
- Align the new blade with the mounting point and secure it in place.
- Double-check that the blade is correctly tightened before resuming use.
By understanding safety precautions and the essential functions and selecting the right blade or attachment for the task, you can confidently and effectively use an oscillating tool for various projects. Remember to prioritize safety at all times and handle the tool with care.
Step-by-Step Instructions for Common Projects
Removing Grout and Caulk:
- Attach a grout removal blade or a carbide-tipped blade to your oscillating tool.
- Hold the tool at a slight angle and gently guide the blade along the grout line to remove the grout.
- Be cautious not to apply excessive pressure to avoid damaging the surrounding tiles.
- Use a scraper attachment for caulk removal and carefully scrape along the line until it is entirely removed.
Cutting Drywall and Wood:
- Select a cutting blade appropriate for the material you are cutting.
- Mark the desired cut line on the drywall or wood.
- Hold the oscillating tool firmly and align the blade with the marked line.
- Slowly guide the tool along the line, applying steady pressure for a clean and precise cut.
Sanding Furniture and Surfaces:
- Attach a sanding pad with the desired grit to the oscillating tool.
- Start with a lower grit for rough sanding and progress to higher grits for a smoother finish.
- Move the oscillating tool in even strokes over the surface, applying light to moderate pressure.
- Keep the tool in motion to avoid uneven sanding, and be cautious not to over sand in one area.
Removing Adhesive and Vinyl Flooring:
- Attach a scraping or adhesive removal blade to the oscillating tool.
- Position the blade at an angle and slowly scrape along the adhesive or underneath the vinyl flooring.
- Apply consistent pressure and adjust the angle as needed to remove the material.
- Take care not to damage the underlying surface during the removal process.
Trimming Baseboards and Molding:
- Choose a flush-cutting blade suitable for cutting wood.
- Hold the oscillating tool steady and align the blade with the area to be trimmed.
- Slowly move the tool along the baseboard or molding, keeping the blade flat against the surface.
- Exercise caution to achieve a clean and precise cut without damaging the surrounding area.
Maintenance and Care
Cleaning and Lubrication:
- After each use, disconnect the oscillating tool from the power source or remove the battery.
- Use a brush or compressed air to remove dust and debris from the tool’s body, vents, and blade attachment area.
- Lubricate any moving parts as recommended by the manufacturer to ensure smooth operation.
Blade Sharpening and Replacement:
- Regularly inspect the condition of your blades. If a blade becomes dull or damaged, replace it with a new one or sharpen it if applicable.
- Follow the manufacturer’s instructions for sharpening or replacing blades to maintain optimal cutting performance.
Storing the Oscillating Tool Properly:
- Store your oscillating tool in a clean and dry place, away from extreme temperatures or moisture.
- Use a designated case or storage box to protect the tool from dust, debris, and potential damage.
- Store the tool in a suitable place that is easily accessible and safely secured to prevent accidental falls or damage.
Troubleshooting
Common Issues and Solutions:
- Check the power source or battery connection if the oscillating tool doesn’t turn on. Replace or charge the battery if necessary.
- If the tool vibrates excessively, ensure the blade is securely attached and not damaged. Adjust or replace the blade if needed.
- If the tool produces unusual noises or smells, turn it off immediately and inspect for any loose parts or signs of damage. Consult the manufacturer or a professional for repairs if required.
Handling Vibrations and Noise:
- To reduce vibrations and noise, firmly grip the tool with both hands during operation.
- Using gloves and a well-balanced grip can help minimize the impact of vibrations on your hands and arms.
- If prolonged use of the tool is causing discomfort or numbness, take regular breaks and consider using vibration-dampening gloves.
Dealing with Power and Battery Problems:
- If the oscillating tool experiences a power loss or the battery drains quickly, check for loose connections or a depleted battery.
- Clean the battery terminals and ensure a secure connection between the battery and the tool.
- If the issue persists, use a different battery or consult the manufacturer.
By following these step-by-step instructions, correctly maintaining your oscillating tool, and troubleshooting common issues, you can make the most out of your tool and accomplish a wide range of projects quickly and efficiently.
Congratulations! You can now maximize your oscillating tool’s capabilities. Also, know how to use an oscillating tool?
This versatile power tool will become your go-to companion for various DIY projects, from plunge cuts to removing old paint and everything in between.
Remember to choose the proper blade for the task, prioritize safety precautions, and maintain your oscillating tool properly.
With practice, you’ll master the art of making precise cuts and achieve professional results in no time. Happy crafting!
FAQs:
Q: What do you use an oscillating tool for?
A: An oscillating tool is used for various tasks such as cutting, sanding, scraping, and grinding. It is versatile and can work on wood, metal, and plastic.
Q: How do you cut straight with an oscillating tool?
A: To cut straight with an oscillating tool, align the blade with the desired cutting line, hold the tool steady, and make slow and controlled movements along the line to achieve a straight cut.
Q: How do you use a multi-tool?
A: Using a multi-tool is easy. Attach the desired accessory or blade, turn on the tool, and guide it along the material to perform the desired task, such as cutting, sanding, or scraping.
Q: How do you cut wood with an oscillating tool?
A: To cut wood with an oscillating tool, attach a wood-cutting blade, position the tool over the wood, and make controlled back-and-forth movements to cut through the material gradually.
Q: Is an oscillating tool a grinder?
A: No, an oscillating tool is not primarily a grinder. While it can perform some grinding tasks with specific attachments, its primary functions include cutting, sanding, scraping, and more.
Q: Can an oscillating tool cut tile?
A: Yes, an oscillating tool can cut tile. The appropriate tile-cutting blade or a grout removal blade can make precise cuts in tile or remove grout between tiles.
Are you interested in How to Use a Flaring Tool? A Step-by-Step Guide 2023


