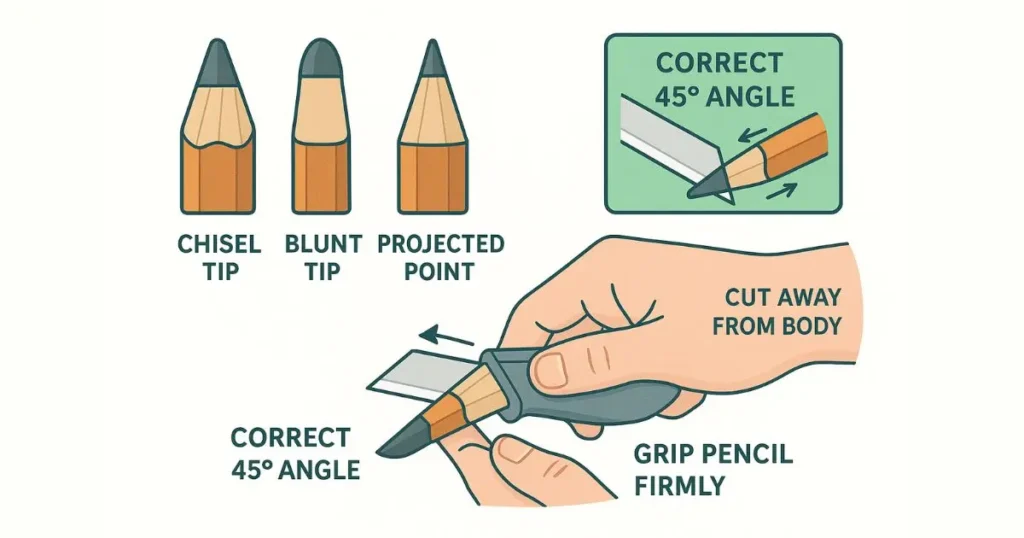
How to Sharpen a Carpenters Pencil Like a Pro? To sharpen a carpenter’s pencil, hold it firmly and use a sharp utility knife or chisel at a 45-degree angle. Carefully shave away the wood in shallow slices until the lead is exposed. Maintain a chisel tip or bullet point based on your marking needs. Finish with sandpaper for extra precision. Always cut away from your body and keep control with slow, steady cuts.
Step-by-Step:
- Hold the pencil firmly in your non-dominant hand.
- Use a sharp knife or chisel, pointed away from you.
- Slice at a 45° angle, removing thin layers of wood.
- Expose the lead gradually, keeping the tip supported by wood.
- Refine the tip using sandpaper for a cleaner edge.
- Wipe off debris to keep your marks clean and sharp.
Quick Tips:
- Use a sharp blade to avoid splintering the wood or breaking the lead.
- Maintain a consistent angle to shape a strong, accurate point.
- Safety first — always cut away from your hand and body.
- Practice improves precision and speed over time.
This guide provides detailed steps, safety tips, and a video demonstration, drawing on practical experience to help you achieve clean, professional results when sharpening a carpenter’s pencil.
Check Also: 5 Best Mechanical Carpenter Pencils for Accuracy Measurement
🎥 Watch the full demonstration video here: DIY Tips: How to Sharpen a Carpenter’s Pencil With a Knife.
Table of Contents
Why Are Carpenter’s Pencils Flat?
Carpenter pencils are flat to prevent rolling on slanted surfaces, a practical feature for construction sites. The rectangular graphite allows thin, precise lines when turned on edge or thicker marks when flat, offering versatility.
Compared to round pencils, their lead is more durable, resisting snaps during heavy use on rough lumber. This design makes learning how to sharpen a carpenter’s pencil critical for maintaining accuracy.
🧰 Essential Tools You’ll Need
To sharpen a carpenter’s pencil like a pro, gather these tools first:
| Tool | Use |
|---|---|
| Utility Knife | The go-to tool for traditional sharpening. Gives control over the shape. |
| Best Carpenter’s Pencil Sharpener | Designed specifically for the flat shape of carpenter pencils. Quick and consistent. |
| Rasp or Sandpaper Block | For fine-tuning the graphite point or creating a chisel edge. |
| Bench Grinder (optional) | For high-speed sharpening when you need precision in bulk. |
| Mechanical Carpenter’s Pencil (alternative) | Great for precision and refillable convenience — no sharpening needed. |
🛠️ Pro Tip: Always keep a sharpening surface (like a block of wood or old board) to brace your hand while carving for better control.
| Tool | Pros | Cons | Best For |
|---|---|---|---|
| Utility Knife | Precise, affordable | Requires skill, safety risks | General carpentry |
| Chisel | Clean cuts, durable | Slower, needs sharpening | Detailed scribing |
| Carpenter Sharpener | Fast, consistent | Limited point styles | Beginners, bulk tasks |
| Bench Grinder | High-speed, precise | Expensive, overkill for most | Professional workshops |
What’s the best carpenter pencil sharpener brand? I prefer a $10 Stanley knife for control, but a C.H. Hanson sharpener and an IRWIN were faster for quick jobs.
Types of Sharpening Styles
1. Classic Point
The classic point is ideal for fine lines on wood, perfect for general carpentry. It stays sharp longer than round pencil points. To sharpen a carpenter’s pencil for a classic point:
- Whittle flat faces with a sharp knife, taking multiple passes to expose the lead.
- Shave the lead to a thin, sharp tip, keeping wood on both sides for support.
- Angle the edges slightly for a clean, strong point.
Personal experience: I’ve found that a sharp utility knife creates a razor-sharp tip that draws crisp lines on pine, lasting through multiple cuts without dulling.
2. Blunt Point for Rough Surfaces
A blunt point suits marking on concrete, stucco, or brick, where fine tips crumble. Follow the classic point steps but stop short of a sharp tip, leaving the lead blunt. This ensures visible lines on uneven surfaces. I’ve used this on concrete blocks, and the blunt tip held up without breaking, unlike round pencils that wore down fast.
3. Offset Scribe Point
The offset scribe point is designed for scribing uneven surfaces with gaps wider than ⅛ inch. It extends the lead for deeper marks. Steps:
- Start whittling from one edge to expose the lead off-center.
- Shave the opposite side lightly to form a long, precise point.
- Clean up the sides for a neat finish.
I once needed to scribe a 3/8-inch gap on drywall. The offset point lets me mark accurately without a scribe block, saving time.
4. Projected Point for Unique Scribing
The projected point is for tasks requiring flush or extended scribing, like marking through complex moldings. Steps:
- Plane one flat face at a shallow angle using a block plane.
- Smooth the face with sandpaper on a flat surface.
- Whittle the lead carefully to align with the wood’s plane.
I used this to scribe a 2×3 through crown molding. The projected point made an accurate line where other methods failed, proving its value in tricky situations.
How to Sharpen a Carpenter’s Pencil: 3 Methods
1. Manual Sharpening with a Knife or Chisel
This offers precision for custom points. Steps:
- Choose a utility knife or chisel.
- Hold the pencil firmly, and angle the tool at 45 degrees.
- Slice shallow wood pieces to expose ¼ inch of lead.
- Guide the knife to shape the lead evenly.
- Sand with 220-grit sandpaper for a bullet or spear-like point.
- Clean graphite dust.
Safety Tips:
- Wear cut-resistant gloves.
- Clap the pencil on a stable surface.
- Point the blade away from you.
- Work in good light.
I nicked my finger rushing a cut. Clamping the pencil now prevents slips.
2. Drill and Sharpener Combo
Per Scott Brown Carpentry (YouTube), use a drill for speed. Steps:
- Secure the pencil in a drill chuck.
- Hold a carpenter’s sharpener steady.
- Run the drill slowly.
My 13mm chuck didn’t fit the ½-inch pencil, but it’s fast for bulk tasks.
3. Universal Socket Adapter
For drills that don’t fit, use an adapter. Steps:
- Attach the adapter to the drill.
- Secure the pencil in spring-loaded pins.
- Spin against a sharpener.
- Refine with an abrasive pad.
At 43, I tried this (YouTube) and got a neat point fast, sanding for a thinner edge.
4. Sharpening for Different Conditions:
- Softwood: Classic point, light pressure.
- Hardwood: Blunt point for dense grain.
- Wet Lumber: Mechanical pencil or blunt point.
- Dusty Sites: Store pencils in a sealed pouch.
I switched to a mechanical pencil on wet cedar to avoid smudging.
5. Safety Tips for Sharpening
To sharpen a carpenter’s pencil safely:
- Wear cut-resistant gloves to protect against slips.
- Use a stable workbench or clamp the pencil for control.
- Point the knife or chisel away from your body.
- Store blades in sheaths to avoid accidental cuts.
- Work in a well-lit area to see your cuts
I once skipped gloves and nicked my thumb. Now, I clamp the pencil and wear gloves every time.
How do I avoid breaking the lead when sharpening? Use shallow cuts and support the lead with wood on both sides. Sand gently to refine.
Finishing Touches
Refine the lead with sandpaper or an abrasive pad to adjust thickness or angle. Test the line width on scrap wood and tweak as needed. I always carry 220-grit sandpaper in my toolbox to fine-tune tips, ensuring sharp, consistent lines.
“Sharpening Mistakes to Avoid”
- Lead keeps snapping? Use shallower cuts.
- Uneven tip? Check your blade angle.
- Can’t hold the pencil steady? Use a clamp or sanding block.
Which Method Is Best for You?
- DIY/Professional Carpenter: Knife whittling gives total control for custom points.
- Beginner/Hobbyist: The drill and sharpener combo is quick and forgiving.
- Rough Surfaces: Blunt or offset points handle concrete or stucco best.
- Creative Tasks: Projected points tackle complex scribing jobs.
I prefer knife sharpening for precision, but use the drill method for speed on busy job sites.
Maintenance Tips
Keep your knife blade razor-sharp for clean cuts. Store pencils in a pouch or with caps to protect the tips. Re-sharpen frequently; dull pencils lead to inaccurate marks. I learned this the hard way when a dull pencil caused a mismeasured cut on a costly board.
Conclusion
Mastering how to sharpen a carpenter’s pencil depends on your project and tools. From knife whittling for precision to drill combos for speed, each method boosts accuracy.
Experiment with classic, blunt, offset, or projected points to find your fit. A sharp carpenter’s pencil ensures clean lines and confident cuts every time.
FAQ – How to Sharpen a Carpenters Pencil
🟡 What’s the fastest way to sharpen a carpenter’s pencil?
The fastest way is to use a carpenter’s pencil sharpener with a power drill. Just insert the pencil into the drill chuck, press it lightly against the sharpener, and spin slowly. This method can sharpen a pencil in seconds — ideal for job sites where speed matters.
Pro Tip: Use a universal socket adapter if your drill chuck doesn’t fit the pencil.
What’s the best point style for framing work?
A chisel tip is ideal — it’s flat and durable, perfect for making thick or thin lines depending on how you angle it.
How often should I sharpen my pencil?
Whenever the lines start to look fuzzy or imprecise. On average, every few boards or cuts if you’re marking often.
Can I use a mechanical pencil instead?
Yes, many pros use mechanical carpenter pencils for fine work. Just make sure it’s rugged enough for the jobsite.
How often should I sharpen a carpenter’s pencil?
Re-sharpen when lines widen or after heavy use, typically every few markings on rough surfaces.
🟢 Can I sharpen a carpenter’s pencil with a regular knife?
Yes, you can use a regular utility knife — but be careful. Make slow, shallow cuts and always carve away from your body. A utility knife gives you full control over the point’s shape, whether you want a sharp chisel tip or a blunt edge for rough surfaces.
Just make sure the blade is sharp to avoid splintering the wood or snapping the lead.
🔴 Why does my carpenter’s pencil keep breaking when I sharpen it?
If your pencil keeps breaking:
1. Your blade might be dull, which causes more pressure and splintering.
2. You might be cutting too deep, exposing too much lead too quickly.
3. Poor-quality pencils sometimes have brittle cores or off-center graphite.
Solution: Use a sharp blade, cut gradually, and support the lead with wood on both sides until the final touches.
Related Articles:
- How Does an Electric Pencil Sharpener Work? in 5 Simple Steps
- The 6 Best Electric Pencil Sharpeners Forever
- How to Use an Electric Pencil Sharpener: 5 Proven Steps
- Best Way to Sharpen Carpenter Pencils: Top 5 Tools Guide