So, you have your wood blank ready. Your pyrography pen is hot. You are excited to start. But then comes the big question: how to transfer pattern for wood burning without making mistakes?
This is a common problem for beginners. Even experienced artists sometimes struggle with getting their design onto the wood the right way.
But don’t worry — you’re not alone! The good news is, there are many simple ways to transfer your pattern. Each method has its own pros and cons.
In this easy guide, we’ll show you how to transfer pattern for wood burning using four popular methods. You can follow these simple steps and find the one that works best for you.
Ready to get started? Let’s dive in and make your next wood-burning project a success!
Table of Contents
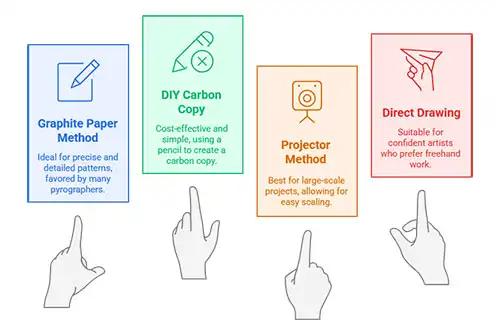
Method 1: The Graphite Paper Method (The Pyrographer’s Favorite)
This is by far one of the most popular and reliable methods for transferring patterns. Graphite paper for wood burning is essentially a carbon-free version of carbon paper, designed to leave a light, easily erasable line.
What you’ll need:
- Your printed pattern
- Graphite transfer paper (also sometimes called tracing paper or pyrography transfer paper)
- Painter’s tape or masking tape
- A pencil or stylus
Step-by-step:
- Prepare your surface: Ensure your wood surface is smooth and clean.
- Position your graphite paper: Place the graphite paper shiny-side down onto your wood surface.
- Secure your pattern: Place your printed pattern directly on top of the graphite paper. Use small pieces of painter’s tape to secure both the graphite paper and your pattern to the wood, ensuring nothing shifts.
- Trace your design: Using a pencil or stylus, carefully trace over all the lines of your pattern. Apply firm, even pressure to ensure the graphite transfers. Periodically lift a corner of your pattern and graphite paper to check if the lines are transferring adequately.
- Remove and burn: Once you’ve traced all your lines, carefully remove the tape, pattern, and graphite paper. You should now have a clear, light outline on your wood, ready for burning.
Pros:
- Clean and erasable: Graphite lines are easy to erase if you make a mistake, unlike carbon paper which can leave permanent marks.
- Precise: Allows for very accurate and detailed transfers.
- Widely available: Easy to find online and in art supply stores.
Cons:
- Can be faint: If you don’t apply enough pressure, the lines might be too faint to see clearly.
- Requires careful tracing: Can be time-consuming for very intricate designs.
Method 2: The DIY Carbon Copy (Using a Pencil!)
Don’t have graphite paper on hand? No problem! You can create your own “carbon paper” using a regular pencil. This is a fantastic improvisation method, especially for those spur-of-the-moment projects.
What you’ll need:
- Your printed pattern
- A soft lead pencil (like a 2B or 4B)
- Painter’s tape or masking tape
- A ballpoint pen or stylus
Step-by-step:
- Darken the back of your pattern: Flip your printed pattern over so the back side is facing up. Using your soft lead pencil, heavily shade the entire area where your design will be. Make sure to apply a thick, even layer of graphite.
- Position on wood: Flip your pattern back over to the front and place it on your wood surface, graphite-side down.
- Secure your pattern: Use small pieces of painter’s tape to secure your pattern to the wood.
- Trace your design: Using a ballpoint pen or stylus, firmly trace over all the lines of your pattern. The pressure from your pen will transfer the graphite from the back of your pattern onto the wood.
- Remove and burn: Carefully remove the tape and your pattern. You should now have your design transferred onto the wood.
Pros:
- Cost-effective: Use materials you likely already have.
- Convenient: Great for last-minute projects when you don’t have specialized supplies.
Cons:
- Can be messy: The graphite on the back of the paper can smudge if you’re not careful.
- Less precise: Might not be as crisp as using dedicated graphite paper.
- Harder to erase: While it’s still pencil, a heavily applied layer can be tougher to erase completely than graphite paper lines.
Method 3: The Projector Method (Go Big or Go Home!)
For larger projects, murals, or when you want to easily resize an image, a projector can be a game-changer. This method is particularly useful if you’re working with complex images or want to ensure perfect proportions.
What you’ll need:
- Your digital pattern or image
- A mini projector or a traditional overhead projector (if you have one!)
- A pencil
Step-by-step:
- Set up your projector: Position your projector to cast your image onto your wood surface. Adjust the distance and focus until the image is the desired size and clarity.
- Position your wood: Ensure your wood blank is stable and in the correct position to receive the projected image.
- Trace your outline: Using a light hand and a pencil, carefully trace the outlines of your projected image onto the wood. Take your time to get the details right.
- Refine and burn: Once you’ve traced the main outlines, you can add any finer details by hand if needed. Then, you’re ready to start burning!
Pros:
- Easy resizing: Quickly scale your image up or down.
- Complex designs: Great for intricate or highly detailed patterns.
- Accurate proportions: Ensures your design is perfectly proportionate.
Cons:
- Equipment needed: Requires a projector, which can be an investment.
- Space requirements: You’ll need adequate space to set up the projector and your wood.
- Can be tricky for small details: Some very fine lines might be difficult to trace accurately from a projected image.
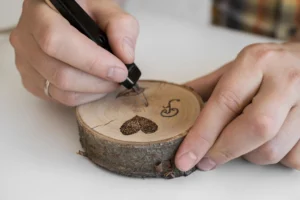
Method 4: Direct Drawing (For the Confident & Creative)
This method is for those who are comfortable with freehand drawing or have a simple, geometric design in mind. It’s the most straightforward but also requires the most artistic confidence.
What you’ll need:
- Your wood surface
- A pencil
- An eraser
Step-by-step:
- Sketch lightly: Using a light hand, gently sketch your design directly onto the wood surface with a pencil. Start with basic shapes and gradually add details.
- Refine your drawing: Once you’re happy with the overall composition, go over your lines with a slightly firmer hand to make them clearer. Erase any mistakes as you go.
- Burn your design: With your design sketched out, you can now proceed with your wood burning.
Pros:
- No extra tools: Only requires a pencil and an eraser.
- Spontaneous and flexible: Allows for on-the-fly adjustments and creative freedom.
- Great for simple designs: Perfect for geometric patterns, lettering, or abstract art.
Cons:
- Requires drawing skills: Not suitable for everyone, especially those new to art.
- Difficult to correct major mistakes: While you can erase, major redraws can be challenging.
- Less precise: Difficult to replicate complex or highly detailed images accurately.
Choosing Your Transfer Method: A Quick Comparison
| Method | Best For | Pros | Cons |
|---|---|---|---|
| Graphite Paper | Detailed, precise, reproducible designs | Clean, erasable, accurate | Can be faint, requires careful tracing |
| DIY Carbon Copy | Quick transfers, no special supplies | Cost-effective, convenient | Can be messy, less precise, harder to erase |
| Projector | Large projects, complex images, resizing | Easy resizing, accurate proportions, handles complex designs | Requires equipment, space-consuming, tricky for tiny details |
| Direct Drawing | Simple designs, freehand, confident artists | No extra tools, spontaneous, flexible | Requires drawing skills, difficult to correct major mistakes |
Which Method is Right for You?
The best method for how to transfer a pattern for wood burning ultimately depends on your project, your skill level, and the tools you have available.
- For beginners, the graphite paper method is highly recommended due to its cleanliness and ease of correction.
- If you’re in a pinch, the DIY carbon copy is a fantastic alternative.
- For ambitious large-scale pieces or perfect reproductions, a projector can be invaluable.
- And if you’re an experienced artist who loves the freedom of the pen, direct drawing is a rewarding approach.
Experiment with these techniques to see which one you prefer and which yields the best results for your unique wood-burning style. Happy burning!
Conclusion
If you want to create neat and beautiful wood-burned art, learning how to transfer pattern for wood burning is a must. A clean pattern transfer makes your design easier to follow and your final work more polished.
There are many simple ways to transfer a pattern. You can use graphite paper for wood burning, make a DIY carbon copy, project your design onto the wood, or draw the pattern by hand. Each method offers an easy way to get your design onto the wood before burning.
Wondering how to transfer pattern for wood burning in the best way? The truth is, it depends on your project and what feels comfortable for you. Some methods work better for large designs, others for small details.
The more you practice, the easier it gets. So, take your time, try different techniques, and soon you’ll find the best method that works for you.
Now that you know how to transfer pattern for wood burning, grab your wood, your design, and your burner—let’s bring your ideas to life!
FAQs: How to Transfer a Pattern for Wood Burning?
Q: Can I use regular carbon paper for wood burning?
A: No, it’s generally not recommended. Regular carbon paper can leave permanent, dark, and smudgy lines that are difficult to erase and can show through your burning, unlike graphite paper which leaves erasable lines.
Q: What kind of pencil should I use for the graphite paper method?
A: You should use a hard, sharp pencil (like a 2H or HB) or a stylus to trace your pattern. Avoid soft lead pencils (like 2B or 4B) as they can smudge easily.
Q: How do I erase transfer lines if I make a mistake?
A: For graphite lines, a soft vinyl eraser or kneaded eraser works best. Always erase gently to avoid damaging the wood grain. If using the DIY carbon copy method, erasing can be trickier, so trace lightly first.
Q: Can I reuse graphite transfer paper?
A: Yes, absolutely! Graphite transfer paper can be reused many times as long as there is still enough graphite on the sheet to transfer lines effectively.
Q: How do I keep my pattern and transfer paper from shifting?
A: The best way is to use small pieces of painter’s tape or masking tape to secure both your pattern and the graphite paper (or DIY carbon paper) firmly to your wood surface before you start tracing.
This post contains affiliate links. I may earn a small commission at no extra cost to you.