As an Amazon Associate, We earn from qualifying purchases. This helps support the blog at no extra cost to you. Thanks for your support!In this guide, we’ll dive into a variety of intermediate carpentry projects tailored for beginners who’ve mastered basic woodworking skills. From a sturdy coffee table to a charming birdhouse, each project comes with a downloadable PDF guide packed with step-by-step instructions. Whether you’re looking to build a custom wine rack or a practical step stool, this article has you covered.
This guide is beginner-friendly, assuming you’ve got some experience with tools like a saw or drill. We’ll walk you through each project with clear instructions, ensuring you feel confident every step of the way.
Below, you’ll find a “Quick Decision” section to pick the right project for you, a detailed tutorial for a featured coffee table, and overviews of other exciting builds all with free PDF downloads.
Ready to start your carpentry journey? Let’s get building!
Quick Decision: Which Project Is Right for You?
- Need something fast? Try the Step Stool or Birdhouse.
- Want furniture? Go for the Coffee Table, Bookshelf, or Wine Rack.
- Love organization? Build the Shoe Organizer or Mudroom Lockers.
- Into decor? Craft a Picture Frame or Plant Stand.
Table of Contents
Choose Your Intermediate Carpentry Projects
Not sure where to begin? This table summarizes each intermediate carpentry projects with its difficulty, estimated time, and key materials, so you can quickly decide based on your skills and resources.
| Project | Difficulty | Estimated Time | Key Materials |
|---|---|---|---|
| Coffee Table | Intermediate | 2-3 days | Wood, screws, wood glue, finish |
| Step Stool | Beginner | 1 day | Wood, screws, wood glue |
| Bookshelf | Intermediate | 2-3 days | Wood, screws, shelf pins |
| Birdhouse | Beginner | 1 day | Wood, nails, wood glue |
| Wine Rack | Intermediate | 2 days | Wood, dowels, wood glue |
| Picture Frame | Beginner | 1 day | Wood, glass, backing |
| Plant Stand | Intermediate | 1-2 days | Wood, screws, finish |
| Charging Station | Intermediate | 1-2 days | Wood, wood glue, finish |
| Painting Bench | Intermediate | 1-2 days | Wood, screws, wood glue |
| Shelves | Beginner | 1 day | Wood, screws, wall anchors |
| Cedar Bath Mat | Intermediate | 1-2 days | Cedar wood, screws |
| Dog Bowl Stand | Beginner | 1 day | Wood, screws, wood glue, bowls |
| Mudroom Lockers | Intermediate | 3-4 days | Plywood, screws, hooks |
| Planter Box | Beginner | 1 day | Wood, screws, wood glue |
| Serving Tray | Beginner | 1 day | Wood, screws, wood glue |
| Shoe Organizer | Beginner | 1-2 days | Wood, screws, wood glue |
| Chess Board | Intermediate | 2-3 days | Maple, walnut, plywood, glue |
17 Intermediate Carpentry Projects
1. Featured Intermediate Carpentry Projects: Coffee Table
Let’s kick things off with one of the most rewarding intermediate carpentry projects a DIY coffee table. This project blends practicality with style, making it a great choice for beginners looking to level up their woodworking game.
Here’s how to build it.
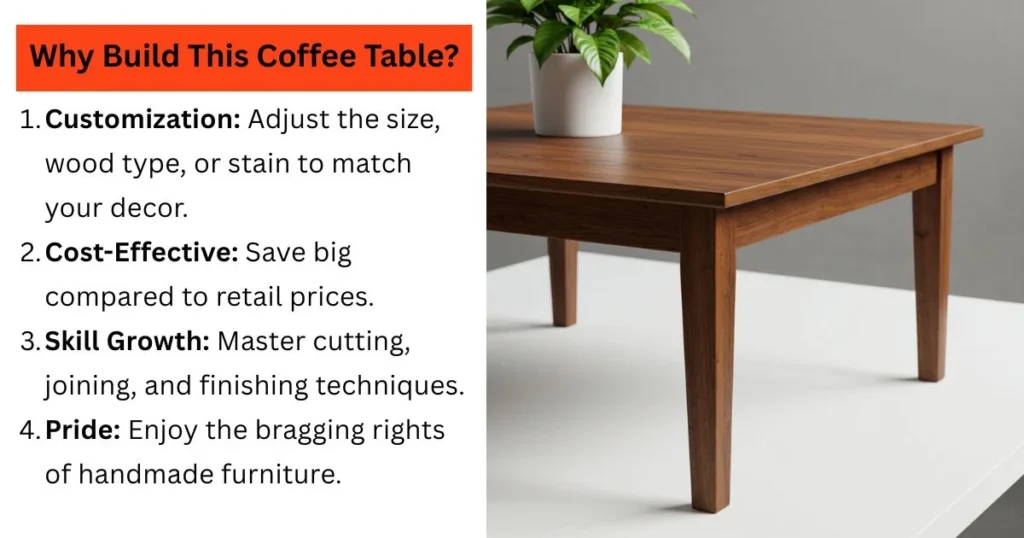
I. Why Build This Coffee Table?
- Customization: Adjust the size, wood type, or stain to match your decor.
- Cost-Effective: Save big compared to retail prices.
- Skill Growth: Master cutting, joining, and finishing techniques.
- Pride: Enjoy the bragging rights of handmade furniture.
Skill Level: Beginner-friendly with some basic tool experience.
What You’ll Learn: This guide covers gathering materials, cutting wood, assembling the frame, and applying a flawless finish.
II. Gathering Your Materials and Tools
Here’s everything you need to build your coffee table.
Materials List
- (4) 2×2 lumber @ 18 inches (legs)
- (4) 1×4 lumber @ 36 inches (aprons)
- (1) ¾-inch plywood sheet @ 24×48 inches (tabletop)
- Wood screws (2-inch, 16 total)
- Wood glue
- Sandpaper (120-grit and 220-grit)
- Wood stain or paint (your choice)
- Polyurethane topcoat
Product Links:
- 2×2 Lumber
- 1×4 Lumber
- Plywood Sheet
- Wood Screws
- Wood Glue
- Sandpaper
- Wood Stain
- Polyurethane
Tools List
- Measuring & Marking: Measuring tape, pencil, square
- Cutting: Circular saw or miter saw
- Joining: Drill/driver, clamps
- Sanding: Orbital sander or sanding block
- Finishing: Paintbrush or rag
- Safety Gear: Safety glasses, hearing protection, dust mask
- Carpenter Pencil Sharpeners
Product Links:
- Measuring Tape
- Circular Saw
- Drill/Driver
- Orbital Sander
- Safety Glasses
III. Step-by-Step Construction Guide
Step 1: Cutting the Wood
- Measure and mark the 2×2 lumber at 18 inches for the legs. Cut four pieces with your saw.
- Mark the 1×4 lumber at 36 inches for the aprons. Cut four pieces.
- Double-check cuts for accuracy precision ensures a sturdy table.
Step 2: Assembling the Aprons (Frame)
- Apply wood glue to the ends of the apron pieces.
- Form a rectangular frame by aligning the aprons, then secure with screws.
- Use a square to confirm 90-degree corners before the glue dries.
Step 3: Attaching the Legs
- Position each leg at a corner of the frame.
- Add wood glue where the legs meet the aprons, then secure with screws (pre-drill pilot holes to avoid splitting).
Step 4: Preparing the Tabletop
- Verify the plywood is 24×48 inches (cut if needed).
- Sand all surfaces and edges start with 120-grit, finish with 220-grit.
Step 5: Attaching the Tabletop to the Frame
- Center the tabletop on the frame.
- From underneath, pre-drill holes and fasten with screws, keeping them below the surface.
IV. Finishing Your Coffee Table
Step 1: Sanding
- Sand the entire table with 120-grit, then 220-grit sandpaper.
- Wipe off dust with a clean cloth.
Step 2: Applying Stain or Paint (Optional)
- Brush or rag on your chosen stain or paint evenly.
- Let it dry fully; add a second coat if you’d like.
Step 3: Applying a Topcoat (Sealer)
- Apply polyurethane with a brush, following the wood grain.
- Dry completely, lightly sand with 220-grit, then add a second coat.
V. Final Touches and Enjoying Your Creation
- Check for imperfections and fix as needed.
- Set your table in place and style it with books or decor.
- Care Tip: Dust regularly and use coasters to protect the finish.
You’ve just completed a standout intermediate carpentry project enjoy your new coffee table!
2. Intermediate Carpentry Projects: Bookshelf
Bookshelves are timeless additions to any home, offering both functionality and a chance to showcase your style. This intermediate carpentry project is perfect for beginners ready to tackle something a bit more challenging. With adjustable shelves and a sturdy design, this bookshelf will become a centerpiece in your living space.
This intermediate carpentry project teaches you how to build a versatile bookshelf with adjustable shelves ideal for any room. It’s a step up from basic builds but still beginner-friendly with the right guidance.
I. Why Build This Bookshelf?
- Customization: Choose the height, width, and finish to suit your space.
- Cost Savings: DIY bookshelves are much cheaper than store-bought options.
- Skill Development: Learn to work with shelf pins and precise measurements.
- Satisfaction: There’s nothing like displaying your books on a shelf you built yourself.
Skill Level: Intermediate (assumes basic tool knowledge and some woodworking experience).
What You’ll Learn: This guide covers material selection, cutting and joining techniques, and finishing touches for a professional look.
II. Gathering Your Materials and Tools
Here’s what you’ll need to build your bookshelf.
Materials List
- (2) 1×12 lumber @ 72 inches (sides)
- (3) 1×12 lumber @ 36 inches (shelves)
- (1) 1×12 lumber @ 38 inches (top)
- (1) ¼-inch plywood sheet @ 36×72 inches (back panel)
- Shelf pins (8-12, depending on desired shelf positions)
- Wood screws (1¼-inch, 20 total)
- Wood glue
- Sandpaper (120-grit and 220-grit)
- Wood stain or paint
- Polyurethane topcoat
Product Links:
- 1×12 Lumber
- Plywood Sheet
- Shelf Pins
- Wood Screws
- Wood Glue
- Sandpaper
- Wood Stain
- Polyurethane
Tools List
- Measuring & Marking: Measuring tape, pencil, square
- Cutting: Circular saw or table saw
- Joining: Drill/driver, clamps, hammer
- Sanding: Orbital sander or sanding block
- Finishing: Paintbrush or rag
- Safety Gear: Safety glasses, hearing protection, dust mask
Product Links:
- Measuring Tape
- Circular Saw
- Drill/Driver
- Orbital Sander
- Safety Glasses
III. Step-by-Step Construction Guide
Step 1: Cutting the Wood
- Measure and cut the side panels to 72 inches from 1×12 lumber.
- Cut three shelves to 36 inches and the top piece to 38 inches.
- Cut the plywood back panel to 36×72 inches.
Step 2: Creating Shelf Pin Holes
- On the inside of the side panels, mark spots for shelf pin holes at desired heights.
- Use a drill with a shelf pin jig or template to ensure even spacing.
- Drill holes for the shelf pins.
Step 3: Assembling the Frame
- Attach the top piece to the side panels using wood glue and screws.
- Ensure the top overhangs slightly on each side for a balanced look.
Step 4: Attaching the Back Panel
- Lay the frame face down and attach the plywood back panel with screws or nails.
- This adds stability and prevents wobbling.
Step 5: Installing the Shelves
- Insert shelf pins into the pre-drilled holes at your chosen heights.
- Place the shelves on the pins, ensuring they’re level.
IV. Finishing Your Bookshelf
Step 1: Sanding
- Sand all surfaces with 120-grit sandpaper, then finish with 220-grit.
- Remove dust with a clean cloth.
Step 2: Applying Stain or Paint
- Apply your chosen stain or paint evenly, following the wood grain.
- Allow it to dry completely; add a second coat if needed.
Step 3: Applying a Topcoat
- Brush on polyurethane for protection, following the grain.
- Let it dry, sand lightly, and apply a second coat for durability.
V. Final Touches and Enjoying Your Creation
- Inspect for any rough spots or uneven finishes.
- Position your bookshelf and load it with books or decor.
- Care Tip: Dust regularly and avoid placing heavy items on adjustable shelves.
Congratulations you’ve built a beautiful, functional bookshelf!
3. Carpentry Projects: Step Stool
Need a boost? This DIY wooden step stool is simple yet essential, ideal for kitchens or garages. This intermediate carpentry project is perfect for beginners looking to build something practical while sharpening their skills.
A step stool is a must-have for reaching high shelves or helping kids at the sink. This intermediate carpentry project guides you through building a sturdy, two-step stool that’s both functional and stylish a quick build with lasting utility.
I. Why Build This Step Stool?
- Customization: Pick wood and finish to suit your style.
- Cost-Effective: Save money compared to store-bought options.
- Skill Growth: Master precise cuts and strong joints.
- Satisfaction: Enjoy a handy tool you crafted yourself.
Skill Level: Beginner-friendly with basic tool knowledge.
What You’ll Learn: Measuring, cutting, assembling, and finishing a small, sturdy piece.
II. Gathering Your Materials and Tools
Materials List
- (2) 1×8 lumber @ 18 inches (steps)
- (4) 1×3 lumber @ 12 inches (legs)
- (2) 1×3 lumber @ 16 inches (supports)
- Wood screws (1½-inch, 12 total)
- Wood glue
- Sandpaper (120-grit and 220-grit)
- Wood stain or paint (optional)
- Polyurethane topcoat (optional)
Product Links:
- 1×8 Lumber
- 1×3 Lumber
- Wood Screws
- Wood Glue
Tools List
- Measuring & Marking: Measuring tape, pencil, square
- Cutting: Circular saw or handsaw
- Joining: Drill/driver, clamps
- Sanding: Sanding block or orbital sander
- Finishing: Paintbrush or rag (if staining/painting)
- Safety Gear: Safety glasses, dust mask
Product Links:
- Circular Saw
- Drill/Driver
III. Step-by-Step Construction Guide
- Cutting the Wood: Cut two 1×8 boards to 18 inches (steps), four 1×3 boards to 12 inches (legs), and two 1×3 boards to 16 inches (supports).
- Assembling the Legs: Form an “A” shape with two legs, attaching a support 6 inches from the bottom using glue and screws. Repeat for the other pair.
- Attaching the Steps: Position the leg assemblies 16 inches apart, then secure the steps across the tops and halfway down with screws and glue.
IV. Finishing Your Step Stool
- Sanding: Sand with 120-grit, then 220-grit sandpaper; wipe clean.
- Staining or Painting: Apply your chosen finish; let dry.
- Topcoat: Add polyurethane for durability (optional).
V. Final Touches and Enjoying Your Creation
- Inspect for rough spots.
- Place in your kitchen or garage.
- Care Tip: Wipe with a damp cloth as needed.
4. Carpentry Project: Painting Bench
Perfect for artists, this DIY painting bench offers a sturdy surface for your next masterpiece. This intermediate carpentry projects is a great way for beginners to create a functional workspace.
A painting bench provides a stable surface for artists and crafters alike. This intermediate carpentry project walks you through building a simple, robust bench tailored to your creative needs.
I. Why Build This Painting Bench?
Skill Level: Intermediate (basic woodworking experience helpful).
- Customization: Size it to fit your space.
- Cost Savings: More affordable than pre-made benches.
- Skill Development: Enhance your measuring and assembly skills.
- Satisfaction: Enjoy a personalized art station.
What You’ll Learn: Building a stable bench with optional storage.
II. Gathering Your Materials and Tools
Materials List
- (1) ¾-inch plywood @ 24×48 inches (benchtop)
- (4) 2×4 lumber @ 18 inches (legs)
- (2) 2×4 lumber @ 20 inches (supports)
- Wood screws (2½-inch, 16 total)
- Wood glue
- Sandpaper (120-grit and 220-grit)
- Paint or stain (optional)
Product Links:
- Plywood
- 2×4 Lumber
Tools List
- Measuring & Marking: Measuring tape, pencil, square
- Cutting: Circular saw or table saw
- Joining: Drill/driver, clamps
- Sanding: Orbital sander or sanding block
- Finishing: Paintbrush (if painting)
- Safety Gear: Safety glasses, dust mask
III. Step-by-Step Construction Guide
- Cutting the Wood: Cut plywood to 24×48 inches (benchtop), four 2x4s to 18 inches (legs), and two 2x4s to 20 inches (supports).
- Assembling the Legs: Form an “H” with two legs and a support, securing with screws and glue. Repeat for the second pair.
- Attaching the Benchtop: Position leg assemblies evenly, then secure the benchtop from underneath.
IV. Finishing Your Painting Bench
- Sanding: Sand with 120-grit, then 220-grit; wipe clean.
- Painting or Staining: Apply your finish; let dry.
V. Final Touches and Enjoying Your Creation
- Check for stability.
- Set up in your workspace.
- Care Tip: Clean with a damp cloth.
5. Shelves
Add storage with these easy DIY shelves customize them for any room. This intermediate carpentry project is ideal for beginners seeking functional wall storage.
Shelves bring order and style to any space. This intermediate carpentry project teaches you to build simple floating shelves, perfect for books, decor, or kitchen essentials.
I. Why Build These Shelves?
- Customization: Adjust size and finish to your needs.
- Cost-Effective: Cheaper than store-bought shelves.
- Skill Growth: Learn to mount sturdy, level shelves.
- Satisfaction: Enjoy a clutter-free room.
Skill Level: Beginner-friendly with basic tools.
What You’ll Learn: Measuring, cutting, and mounting shelves.
II. Gathering Your Materials and Tools
Materials List
- (1) 1×10 lumber @ 48 inches (shelf)
- (2) 1×2 lumber @ 10 inches (supports)
- Wood screws (1½-inch, 8 total)
- Wall anchors (if needed)
- Sandpaper (120-grit and 220-grit)
- Wood stain or paint (optional)
Tools List
- Measuring & Marking: Measuring tape, pencil, level
- Cutting: Circular saw or handsaw
- Joining: Drill/driver
- Sanding: Sanding block
- Finishing: Paintbrush or rag
- Safety Gear: Safety glasses, dust mask
III. Step-by-Step Construction Guide
- Cutting the Wood: Cut 1×10 to 48 inches (shelf) and two 1x2s to 10 inches (supports).
- Assembling the Shelf: Attach supports to the underside of the shelf, flush with the ends, using screws.
- Mounting the Shelf: Secure to wall studs (or use anchors) via the supports.
IV. Finishing Your Shelves
- Sanding: Sand with 120-grit, then 220-grit; wipe clean.
- Staining or Painting: Apply your finish; let dry.
V. Final Touches and Enjoying Your Creation
- Ensure it’s level.
- Style with decor.
- Care Tip: Avoid overloading.
6. Birdhouse
Attract birds with a beginner-friendly birdhouse a fun, quick build. This intermediate carpentry project is a charming addition to any outdoor space.
A birdhouse brings life to your garden. This intermediate carpentry project shows you how to build a simple, attractive birdhouse that’s easy to assemble and hang.
I. Why Build This Birdhouse?
- Customization: Paint it to match your yard.
- Cost Savings: Uses inexpensive materials.
- Skill Development: Practice basic cuts and assembly.
- Satisfaction: Watch birds settle in.
Skill Level: Beginner-friendly.
What You’ll Learn: Cutting and assembling a small wooden structure.
II. Gathering Your Materials and Tools
Materials List
- (1) 1×6 lumber @ 12 inches (front and back)
- (2) 1×6 lumber @ 8 inches (sides)
- (1) 1×6 lumber @ 6 inches (bottom)
- (1) 1×8 lumber @ 10 inches (roof)
- Wood screws (1-inch, 10 total)
- Wood glue
- Sandpaper (120-grit)
- Outdoor paint or stain
Tools List
- Measuring & Marking: Measuring tape, pencil
- Cutting: Handsaw or circular saw
- Joining: Drill/driver
- Sanding: Sanding block
- Finishing: Paintbrush
- Safety Gear: Safety glasses, dust mask
III. Step-by-Step Construction Guide
- Cutting the Wood: Cut pieces as listed for front, back, sides, bottom, and roof.
- Assembling the Birdhouse: Attach sides to back, then front (with a 1.5-inch entry hole), and bottom with screws and glue.
- Attaching the Roof: Secure the roof with screws, ensuring a slight overhang.
IV. Finishing Your Birdhouse
- Sanding: Sand with 120-grit; wipe clean.
- Painting or Staining: Apply outdoor finish; let dry.
V. Final Touches and Enjoying Your Creation
- Hang from a tree or post.
- Care Tip: Clean annually.
7. Cedar Bath Mat
Upgrade your bathroom with a cedar bath mat aromatic and water-resistant. This intermediate carpentry project adds a spa-like touch to your space.
A cedar bath mat offers natural moisture resistance and a pleasant scent. This intermediate carpentry project guides you through building a slatted mat that’s both functional and elegant.
I. Why Build This Cedar Bath Mat?
- Customization: Size it to your bathroom.
- Cost Savings: Cedar is affordable and durable.
- Skill Growth: Work with cedar and slatted designs.
- Satisfaction: Enjoy a luxurious bath experience.
Skill Level: Intermediate (some tool experience).
What You’ll Learn: Cutting and assembling cedar for durability.
II. Gathering Your Materials and Tools
Materials List
- (10) 1×2 cedar boards @ 24 inches (slats)
- (2) 1×2 cedar boards @ 18 inches (supports)
- Wood screws (1½-inch, 20 total)
- Sandpaper (120-grit and 220-grit)
- Cedar-safe finish (optional)
Tools List
- Measuring & Marking: Measuring tape, pencil
- Cutting: Circular saw or miter saw
- Joining: Drill/driver
- Sanding: Sanding block
- Finishing: Brush (if applying finish)
- Safety Gear: Safety glasses, dust mask
III. Step-by-Step Construction Guide
- Cutting the Wood: Cut ten 1×2 cedar boards to 24 inches (slats) and two to 18 inches (supports).
- Arranging the Slats: Lay slats with ½-inch gaps.
- Attaching the Supports: Secure supports perpendicular to slats near each end with screws.
IV. Finishing Your Cedar Bath Mat
- Sanding: Sand with 120-grit, then 220-grit; wipe clean.
- Applying Finish: Add a cedar-safe finish (optional); let dry.
V. Final Touches and Enjoying Your Creation
- Place in your bathroom.
- Care Tip: Dry between uses.
8. Charging Station
Tame cords with a DIY charging station sleek and functional. This intermediate carpentry project keeps your devices organized.
A charging station declutters your space while powering your devices. This intermediate carpentry project teaches you to build a modern station with slots for phones and tablets.
I. Why Build This Charging Station?
- Customization: Fit your devices perfectly.
- Cost-Effective: Affordable materials, high-end look.
- Skill Development: Precise cuts and assembly.
- Satisfaction: Enjoy a tidy space.
Skill Level: Intermediate (some experience recommended).
What You’ll Learn: Building a multi-device station with cord management.
II. Gathering Your Materials and Tools
Materials List
- (1) 1×6 lumber @ 12 inches (base)
- (2) 1×4 lumber @ 6 inches (sides)
- (1) 1×4 lumber @ 12 inches (back)
- (3) 1×2 lumber @ 12 inches (dividers)
- Wood screws (1-inch, 12 total)
- Wood glue
- Sandpaper (120-grit and 220-grit)
- Paint or stain (optional)
Tools List
- Measuring & Marking: Measuring tape, pencil
- Cutting: Circular saw or handsaw
- Joining: Drill/driver
- Sanding: Sanding block
- Finishing: Paintbrush
- Safety Gear: Safety glasses, dust mask
III. Step-by-Step Construction Guide
- Cutting the Wood: Cut pieces as listed for base, sides, back, and dividers.
- Assembling the Frame: Attach sides to base, then back, with screws and glue.
- Adding the Dividers: Space dividers evenly and secure.
IV. Finishing Your Charging Station
- Sanding: Sand with 120-grit, then 220-grit; wipe clean.
- Painting or Staining: Apply finish; let dry.
V. Final Touches and Enjoying Your Creation
- Place on a desk.
- Care Tip: Keep cords tidy.
9. Dog Bowl Stand
Elevate pet feeding with a DIY dog bowl stand—simple and pet-approved. This intermediate carpentry project enhances your pet’s mealtime.
A raised dog bowl stand improves comfort and reduces mess. This intermediate carpentry project shows you how to build a sturdy, easy-to-clean stand.
I. Why Build This Dog Bowl Stand?
- Customization: Size it for your dog.
- Cost Savings: Affordable materials.
- Skill Growth: Cutting and assembly skills.
- Satisfaction: Happy pet, happy home.
Skill Level: Beginner-friendly.
What You’ll Learn: Building a stable stand with bowl cutouts.
II. Gathering Your Materials and Tools
Materials List
- (1) 1×12 lumber @ 24 inches (top)
- (4) 2×2 lumber @ 6 inches (legs)
- Wood screws (2-inch, 8 total)
- Wood glue
- Sandpaper (120-grit and 220-grit)
- Paint or stain (optional)
- Dog bowls (2)
Tools List
- Measuring & Marking: Measuring tape, pencil
- Cutting: Circular saw or handsaw, jigsaw
- Joining: Drill/driver
- Sanding: Sanding block
- Finishing: Paintbrush
- Safety Gear: Safety glasses, dust mask
III. Step-by-Step Construction Guide
- Cutting the Wood: Cut 1×12 to 24 inches (top) and four 2x2s to 6 inches (legs).
- Cutting Holes for Bowls: Mark and cut two circles for bowls with a jigsaw.
- Attaching the Legs: Secure legs at corners with screws and glue.
IV. Finishing Your Dog Bowl Stand
- Sanding: Sand with 120-grit, then 220-grit; wipe clean.
- Painting or Staining: Apply finish; let dry.
V. Final Touches and Enjoying Your Creation
- Add bowls and place in feeding area.
- Care Tip: Wipe after use.
10. Mudroom Lockers
Boost entryway storage with DIY mudroom lockers great for families. This intermediate carpentry project tackles larger builds.
Mudroom lockers keep your entryway organized. This intermediate carpentry project guides you through building a customizable locker unit with hooks and shelves.
I. Why Build These Mudroom Lockers?
- Customization: Fit your space and style.
- Cost-Effective: Cheaper than pre-made units.
- Skill Development: Build multi-component structures.
- Satisfaction: Enjoy an organized entry.
Skill Level: Intermediate (some experience recommended).
What You’ll Learn: Constructing a multi-section locker.
II. Gathering Your Materials and Tools
Materials List
- (2) ¾-inch plywood @ 48×96 inches (sides, dividers)
- (1) ¾-inch plywood @ 24×48 inches (top, bottom)
- (4) 1×2 lumber @ 48 inches (trim)
- Wood screws (1½-inch and 2-inch)
- Wood glue
- Sandpaper (120-grit and 220-grit)
- Paint or stain
- Hooks
Tools List
- Measuring & Marking: Measuring tape, pencil, square
- Cutting: Circular saw or table saw
- Joining: Drill/driver, clamps
- Sanding: Orbital sander
- Finishing: Paintbrush
- Safety Gear: Safety glasses, dust mask
III. Step-by-Step Construction Guide
- Cutting the Wood: Cut plywood for sides, top, bottom, and dividers; cut trim.
- Assembling the Frame: Attach sides to top and bottom, add dividers.
- Adding Trim and Hooks: Attach trim to edges, install hooks inside.
IV. Finishing Your Mudroom Lockers
- Sanding: Sand with 120-grit, then 220-grit; wipe clean.
- Painting or Staining: Apply finish; let dry.
V. Final Touches and Enjoying Your Creation
- Install in your entryway.
- Care Tip: Wipe regularly.
11. Picture Frame
Showcase memories with a handmade picture frame perfect for gifting. This intermediate carpentry project adds a personal touch.
A custom picture frame elevates your photos. This intermediate carpentry project teaches you to build a simple, elegant frame ideal for gifting or display.
I. Why Build This Picture Frame?
- Customization: Size and finish to your liking.
- Cost Savings: Affordable materials.
- Skill Growth: Precision cutting and joining.
- Satisfaction: Display your craftsmanship.
Skill Level: Beginner-friendly.
What You’ll Learn: Cutting miters and assembling a frame.
II. Gathering Your Materials and Tools
Materials List
- (4) 1×2 lumber @ 12 inches (frame sides)
- Wood glue
- Sandpaper (120-grit and 220-grit)
- Paint or stain (optional)
- Glass pane and backing (for 8×10 photo)
Tools List
- Measuring & Marking: Measuring tape, pencil
- Cutting: Miter saw or handsaw with miter box
- Joining: Clamps
- Sanding: Sanding block
- Finishing: Paintbrush
- Safety Gear: Safety glasses, dust mask
III. Step-by-Step Construction Guide
- Cutting the Wood: Cut four 1x2s to 12 inches with 45-degree mitered ends.
- Assembling the Frame: Glue and clamp the mitered corners to form a rectangle.
- Securing the Frame: Let glue dry, then reinforce with small nails if needed.
IV. Finishing Your Picture Frame
- Sanding: Sand with 120-grit, then 220-grit; wipe clean.
- Painting or Staining: Apply finish; let dry.
V. Final Touches and Enjoying Your Creation
- Add glass, photo, and backing.
- Care Tip: Dust lightly.
12. Plant Stand
Display greenery with a DIY plant stand stylish and stable. This intermediate carpentry project enhances your home decor.
A plant stand showcases your greenery with elegance. This intermediate carpentry project guides you through building a simple, sturdy stand.
I. Why Build This Plant Stand?
- Customization: Adjust height and finish.
- Cost-Effective: Uses basic materials.
- Skill Growth: Build a balanced structure.
- Satisfaction: Elevate your plants.
Skill Level: Beginner-friendly.
What You’ll Learn: Cutting and assembling a tiered stand.
II. Gathering Your Materials and Tools
Materials List
- (1) 1×12 lumber @ 12 inches (top)
- (4) 1×2 lumber @ 18 inches (legs)
- Wood screws (1½-inch, 8 total)
- Wood glue
- Sandpaper (120-grit and 220-grit)
- Paint or stain (optional)
Tools List
- Measuring & Marking: Measuring tape, pencil
- Cutting: Circular saw or handsaw
- Joining: Drill/driver
- Sanding: Sanding block
- Finishing: Paintbrush
- Safety Gear: Safety glasses, dust mask
III. Step-by-Step Construction Guide
- Cutting the Wood: Cut 1×12 to 12 inches (top) and four 1x2s to 18 inches (legs).
- Attaching the Legs: Angle legs outward slightly, secure to top with screws and glue.
IV. Finishing Your Plant Stand
- Sanding: Sand with 120-grit, then 220-grit; wipe clean.
- Painting or Staining: Apply finish; let dry.
V. Final Touches and Enjoying Your Creation
- Place a plant on top.
- Care Tip: Avoid water pooling.
13. Planter Box
Grow herbs in a DIY planter box ideal for patios or kitchens. This intermediate carpentry project brings fresh greenery indoors or out.
A planter box is perfect for herbs or flowers. This intermediate carpentry project shows you how to build a simple, durable box for your plants.
I. Why Build This Planter Box?
- Customization: Size it to your space.
- Cost Savings: Affordable materials.
- Skill Growth: Build a sturdy container.
- Satisfaction: Enjoy home-grown herbs.
Skill Level: Beginner-friendly.
What You’ll Learn: Assembling a box with drainage.
II. Gathering Your Materials and Tools
Materials List
- (2) 1×6 lumber @ 24 inches (sides)
- (2) 1×6 lumber @ 6 inches (ends)
- (1) 1×6 lumber @ 24 inches (bottom)
- Wood screws (1½-inch, 12 total)
- Wood glue
- Sandpaper (120-grit and 220-grit)
- Paint or stain (optional)
Tools List
- Measuring & Marking: Measuring tape, pencil
- Cutting: Circular saw or handsaw
- Joining: Drill/driver
- Sanding: Sanding block
- Finishing: Paintbrush
- Safety Gear: Safety glasses, dust mask
III. Step-by-Step Construction Guide
- Cutting the Wood: Cut pieces as listed for sides, ends, and bottom.
- Assembling the Box: Attach sides to ends, then bottom, with screws and glue.
- Adding Drainage: Drill small holes in the bottom.
IV. Finishing Your Planter Box
- Sanding: Sand with 120-grit, then 220-grit; wipe clean.
- Painting or Staining: Apply finish; let dry.
V. Final Touches and Enjoying Your Creation
- Add soil and plants.
- Care Tip: Water sparingly.
14. Serving Tray
Serve in style with a handmade serving tray great for entertaining. This intermediate carpentry project adds flair to your gatherings.
A serving tray is both practical and decorative. This intermediate carpentry project teaches you to build a tray with handles for easy carrying.
I. Why Build This Serving Tray?
- Customization: Choose size and finish.
- Cost-Effective: Simple materials.
- Skill Growth: Build a handled tray.
- Satisfaction: Impress your guests.
Skill Level: Beginner-friendly.
What You’ll Learn: Assembling a tray with handles.
II. Gathering Your Materials and Tools
Materials List
- (1) 1×12 lumber @ 18 inches (base)
- (2) 1×2 lumber @ 18 inches (sides)
- (2) 1×2 lumber @ 10 inches (ends/handles)
- Wood screws (1-inch, 12 total)
- Wood glue
- Sandpaper (120-grit and 220-grit)
- Paint or stain (optional)
Tools List
- Measuring & Marking: Measuring tape, pencil
- Cutting: Circular saw or handsaw
- Joining: Drill/driver
- Sanding: Sanding block
- Finishing: Paintbrush
- Safety Gear: Safety glasses, dust mask
III. Step-by-Step Construction Guide
- Cutting the Wood: Cut pieces as listed for base, sides, and ends.
- Assembling the Tray: Attach sides and ends to base with screws and glue.
- Adding Handles: Cut handholds in the end pieces with a jigsaw.
IV. Finishing Your Serving Tray
- Sanding: Sand with 120-grit, then 220-grit; wipe clean.
- Painting or Staining: Apply finish; let dry.
V. Final Touches and Enjoying Your Creation
- Use for serving drinks or snacks.
- Care Tip: Wipe clean after use.
15. Shoe Organizer
Tidy up with a DIY shoe organizer practical and space-saving. This intermediate carpentry project keeps your footwear in check.
A shoe organizer declutters your entryway. This intermediate carpentry project guides you through building a simple, tiered rack.
I. Why Build This Shoe Organizer?
- Customization: Fit your shoe collection.
- Cost-Effective: Basic materials.
- Skill Growth: Build a multi-tier structure.
- Satisfaction: Enjoy an organized space.
Skill Level: Beginner-friendly.
What You’ll Learn: Constructing a tiered rack.
II. Gathering Your Materials and Tools
Materials List
- (2) 1×12 lumber @ 36 inches (sides)
- (3) 1×12 lumber @ 24 inches (shelves)
- Wood screws (1½-inch, 12 total)
- Wood glue
- Sandpaper (120-grit and 220-grit)
- Paint or stain (optional)
Tools List
- Measuring & Marking: Measuring tape, pencil
- Cutting: Circular saw or handsaw
- Joining: Drill/driver
- Sanding: Sanding block
- Finishing: Paintbrush
- Safety Gear: Safety glasses, dust mask
III. Step-by-Step Construction Guide
- Cutting the Wood: Cut two 1x12s to 36 inches (sides) and three to 24 inches (shelves).
- Assembling the Organizer: Attach shelves to sides at even intervals with screws and glue.
IV. Finishing Your Shoe Organizer
- Sanding: Sand with 120-grit, then 220-grit; wipe clean.
- Painting or Staining: Apply finish; let dry.
V. Final Touches and Enjoying Your Creation
- Place in your entryway.
- Care Tip: Dust regularly.
16. Wine Rack
Store bottles in a DIY wine rack elegant and intermediate-level fun. This intermediate carpentry project adds sophistication to your home.
A wine rack keeps your bottles organized and stylish. This intermediate carpentry project teaches you to build a simple rack for your collection.
I. Why Build This Wine Rack?
- Customization: Fit your bottle count.
- Cost-Effective: Affordable materials.
- Skill Growth: Build a slotted structure.
- Satisfaction: Display your wine with pride.
Skill Level: Intermediate.
What You’ll Learn: Creating a slotted wine storage unit.
II. Gathering Your Materials and Tools
Materials List
- (2) 1×12 lumber @ 24 inches (sides)
- (3) 1×6 lumber @ 12 inches (shelves)
- Wood screws (1½-inch, 12 total)
- Wood glue
- Sandpaper (120-grit and 220-grit)
- Paint or stain (optional)
Tools List
- Measuring & Marking: Measuring tape, pencil
- Cutting: Circular saw or handsaw
- Joining: Drill/driver
- Sanding: Sanding block
- Finishing: Paintbrush
- Safety Gear: Safety glasses, dust mask
III. Step-by-Step Construction Guide
- Cutting the Wood: Cut two 1x12s to 24 inches (sides) and three 1x6s to 12 inches (shelves).
- Cutting Slots: Cut semi-circles in shelves for bottles using a jigsaw.
- Assembling the Rack: Attach shelves to sides with screws and glue.
IV. Finishing Your Wine Rack
- Sanding: Sand with 120-grit, then 220-grit; wipe clean.
- Painting or Staining: Apply finish; let dry.
V. Final Touches and Enjoying Your Creation
- Place bottles in slots.
- Care Tip: Keep in a cool, dry spot.
17. Chess Board
Challenge friends with a handmade chess board a unique woodworking feat. This intermediate carpentry project is a standout piece.
A chess board is a rewarding build for game lovers. This intermediate carpentry project guides you through creating a classic board with contrasting woods.
I. Why Build This Chess Board?
- Customization: Choose wood types and finish.
- Cost-Effective: DIY is cheaper than artisanal boards.
- Skill Growth: Master precision and inlay work.
- Satisfaction: Play on your own creation.
Skill Level: Intermediate (precision required).
What You’ll Learn: Cutting and assembling a checkered pattern.
II. Gathering Your Materials and Tools
Materials List
- (1) 1×2 maple lumber @ 16 inches (light squares)
- (1) 1×2 walnut lumber @ 16 inches (dark squares)
- (1) ¾-inch plywood @ 16×16 inches (base)
- Wood glue
- Sandpaper (120-grit and 220-grit)
- Polyurethane
- Chess pieces (optional)
Tools List
- Measuring & Marking: Measuring tape, pencil
- Cutting: Table saw or miter saw
- Joining: Clamps
- Sanding: Orbital sander
- Finishing: Brush
- Safety Gear: Safety glasses, dust mask
III. Step-by-Step Construction Guide
- Cutting the Wood: Cut maple and walnut into 2-inch strips, then into 2×2-inch squares (32 total).
- Assembling the Board: Glue squares in a checkered pattern, clamp, and let dry.
- Attaching to Base: Glue the board to plywood base.
IV. Finishing Your Chess Board
- Sanding: Sand with 120-grit, then 220-grit; wipe clean.
- Applying Topcoat: Apply polyurethane; let dry.
V. Final Touches and Enjoying Your Creation
- Add chess pieces and play.
- Care Tip: Store flat to avoid warping.
Conclusion
Intermediate carpentry projects are your gateway to mastering woodworking while crafting pieces you’ll love. Whether you build a coffee table, a bookshelf, or a wine rack, each project builds your skills and confidence. Download the free PDF guides, grab your tools, and start creating your next masterpiece awaits.
FAQs for intermediate carpentry projects
What are intermediate carpentry projects?
Woodworking tasks needing basic tool skills, perfect for beginners advancing to create items like furniture or decor.
What tools do I need for intermediate carpentry projects?
Measuring tape, saw (circular or miter), drill/driver, clamps, sandpaper, and safety gear like glasses and a dust mask.
How long do intermediate carpentry projects take?
Typically 1-3 days, though simpler ones like a step stool may take a few hours.
Can beginners tackle intermediate carpentry projects?
Yes, if you have some tool experience; step-by-step guides make it manageable.
Where can I find free plans for intermediate carpentry projects?
The article offers downloadable PDF guides with materials lists and instructions.
What are the benefits of building intermediate carpentry projects?
Save money, customize designs, gain skills, and enjoy the pride of handmade creations.